Radiator Versions
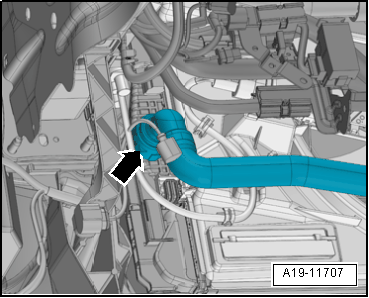
Vehicles with Version 1 Radiator:

-- Attach the left coolant hose with the coupling -arrow- to the bottom of the radiator. Refer to Figure.
-- Attach the right coolant hose with the coupling -arrow- to the bottom of the charge air cooling circuit cooler. Refer to Figure.

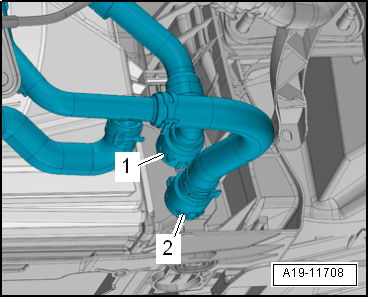
Vehicles with Version 2 Radiator:

-- Connect the coolant hose and the upper right coupling -1- to the radiator. Refer to Figure.
-- Attach the right coolant hose with the coupling -2- to the bottom of the charge air cooling circuit cooler. Refer to Figure.
Vehicles with Version 3 Radiator:
-- Attach the left coolant hose with the coupling -arrow- to the bottom of the radiator. Refer to Figure.
-- Attach the coolant hoses with the coupling -1 and 2- to the charge air cooling circuit cooler. Refer to Figure.
Continuation for All Vehicles:

-- Attach the coolant hose with a hose clamp -arrow- to the bottom of the Heater Support Pump -V488-.
Coolant, Filling without Cooling System Charge Kit - Electric Vacuum Pump :VAS 6096/2

TIP:
Coolant, Filling with Cooling System Charge Kit - Electric Vacuum Pump :VAS 6096/2 . Refer to COOLANT, FILLING WITH Cooling System Charge Kit - Electric Vacuum Pump .
- Ignition switched off.
- To make the filling procedure easier, position the coolant reservoir as high up as possible, for example on a workshop cart or the engine and gearbox jack.
-- Fill the coolant reservoir on the Cooling System Charge Kit :VAS 6096 with at least eight liters of premixed coolant with the proper mixture ratio.
-- Install the Cooling System Tester - Adapter :V.A.G 1274/8 on the coolant expansion tank -1-.
-- Mount the Cooling System Charge Kit :VAS 6096 on the Cooling System Tester - Adapter :V.A.G 1274/8 .
-- Place the drain hose -2- in a small container -3-.
TIP:
A small amount of coolant which should be collected is drawn off with the discharged air.
-- Close the valves -A- and -B- by turning lever at a right angle to the flow direction.
-- Connect the hose -4- to compressed air.
- Pressure: 7 to 10 bar (101.53 to 145.04 psi) positive pressure.
-- Open the valve -B- by turning the lever in the flow direction.

- The suction jet pump generates vacuum in the coolant system; indicator on display instrument must move into green area.
-- Briefly open the valve -A- by turning the lever in the flow direction so that the hose on the Cooling System Charge Kit :VAS 6096 coolant reservoir fills with coolant.
-- Close the valve -A- again.
-- Leave the valve -B- open another two minutes.
- More pressure is generated in the coolant system by the suction jet pump; indicator on display instrument must stay in the green area.
-- Close the valve -B-.
- Needle in the display instrument must remain in the green region, then the sufficient vacuum in the cooling system is obtained for the upcoming filling.
- If the needle stands below the green area, repeat the procedure.
- If the pressure falls, check the coolant system for leaks.
-- Remove the pressure hose.
-- Open the valve -A-.
- Coolant is extracted from the Cooling System Charge Kit :VAS 6096 coolant reservoir by pressure in the coolant system and the system is filled.
-- Remove the Cooling System Charge Kit :VAS 6096 from the coolant expansion tank.
-- Fill the coolant to the MAX mark.
-- Install the noise insulation. Refer to OVERVIEW - NOISE INSULATION .