COOLANT, FILLING WITH Cooling System Charge Kit - Electric Vacuum Pump:VAS 6096/2: Notes
Using the Cooling System Charge Kit - Electric Vacuum Pump :VAS 6096/2 will achieve a greater vacuum in the cooling system. The higher vacuum results in less air in the cooling system after filling.
Special tools and workshop equipment required
- Cooling System Tester - Directional Valve :VAS 691 005/5
- Vehicle Diagnostic Tester
- Cooling System Charge Device :VAS 6968
, if equipped
- Cooling System Charge Kit - Electric Vacuum Pump :VAS 6096/2
- Cooling System Charge Kit :VAS 6096
- Shop Crane - Drip Tray :VAS 6208
- Refractometer :T10007 A or Analog Refractometer :T10007B
- Hose Clamps - Up To 25 mm :3094


Conditions:
- The coolant was drained as described under Refer to COOLANT, DRAINING AND FILLING WITHOUT Cooling System Charge Kit - Electric Vacuum Pump .
-- Reconnect all coolant hoses that have been removed. Refer to Radiator Versions .
-- Attach the Cooling System Tester - Directional Valve :VAS 691 005/5 -2- to the coolant expansion tank -1-.

-- Perform the check of the Cooling System Charge Kit - Electric Vacuum Pump :VAS 6096/2 . Refer to Cooling System Charge Kit - Electric Vacuum Pump .
-- Position the Cooling System Charge Device VAS 6968 so that it is higher than the coolant expansion tank -arrows- and fill it with at least 10 liters of premixed coolant with the right mixture ratio. Pay attention to the coolant notes. Refer to Fill And Bleed The Coolant Circuit .

-- Connect the Cooling System Charge Kit :VAS 6096 as shown on the Cooling System Charge Kit :VAS 6968 .
- Do not connect the Cooling System Charge Kit : VAS 6096 on the Cooling System Tester - Directional Valve :VAS 691 005/5 yet. The filling hose must first be bled.
-- Bleed the hose -2- to do so quickly open the valve on the Coolant Reservoir and quickly open the valves -A- and -B-, until the hose -2- is filled with coolant.
-- Close the valves -A- and -B- by turning lever at a right angle to the flow direction.
-- Open the cap -1- on the Cooling System Charge Device :VAS 6968 .
-- Connect the Cooling System Charge Kit -1- on the test adapter -2-.

-- Connect the hose -1- of the Cooling System Charge Kit - Electric Vacuum Pump :VAS 6096/2 to the connector coupling -B- on the Cooling System Charge Kit.
-- Connect the Cooling System Charge Kit - Electric Vacuum Pump :VAS 6096/2 on the vehicle battery and switch on. Open the valve -B-.
-- When vacuum extracting, make sure that the water separator -1- in the vacuum pump does not get full of coolant.

Risk of damaging the Electric Vacuum Pump due to extracted coolant.
- Make sure the Electric Vacuum Pump does not extract any coolant. If necessary, stop the procedure and evacuate the coolant expansion tank. Refer to When the water separator in the is filled with coolant, the coolant expansion tank must be extracted: .
-- Extract using the Electric Vacuum Pump until the needle on the pressure gauge -arrow- is well below the green area.
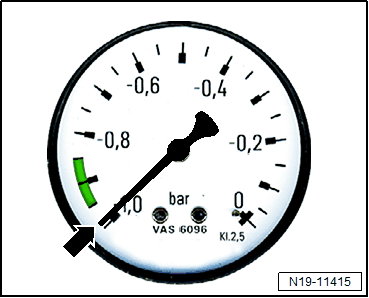
-- Close the valve -B- and switch off the Cooling System Charge Kit - Electric Vacuum Pump :VAS 6096/2 .
-- Watch the pressure gauge. The needle of the pressure gauge must not move.
-- When the conditions met, the cooling system can be filled. Refer to Cooling system, filling .