Gm Of CANADA ONSTAR® Cellular Communication Upgrade (15-08-44-001H)
Publication date: 2016-06-20Reference number: 15-08-44-001H
Supersedes refnos: 15-08-44-001, 15-08-44-001A, 15-08-44-001B, 15-08-44-001C, 15-08-44-001D, 15-08-44-001E, 15-08-44-001F
GM OF CANADA ONSTAR® CELLULAR COMMUNICATION UPGRADE
TECHNICAL SERVICE BULLETIN
| Affected Model(s): | 2000-2014 GM Passenger Cars and Light Duty Trucks 2015 Buick Enclave 2015 Cadillac Escalade Models (Built W/O VV4) 2015 Chevrolet Camaro, Express, Traverse 2015 Chevrolet Silverado 2500/3500, Suburban, Tahoe (Built W/O VV4) 2012 Chevrolet Colorado 2015 GMC Acadia, Savana 2015 GMC Sierra 2500/3500, Yukon Models (Built W/O VV4) 2012 GMC Canyon 2005-2010 Pontiac Vibe Equipped with OnStar® (RPO UE1) |
| Attention: | This Bulletin does not apply to vehicles equipped with RPO UE0. |
| Supercedes: | This Bulletin has been revised to add Software issues related to this bulletin section. Please discard Corporate Bulletin Number 15-08-44-001G. |
CANADIAN UPGRADE PROGRAM OVERVIEW
Canadian wireless service providers plan to decommission their 2G Code Division Multiple Access (CDMA) network through 2015. OnStar® currently depends on active and functioning 2G CDMA networks to deliver services. As a result, in order to continue to provide OnStar® services without interruption, Canadian vehicles that do not have OnStar® 3G/4G LTE will need a hardware upgrade.
In order to upgrade their vehicle hardware and continue receiving OnStar® services, a customer will receive a letter from OnStar® with instructions for the upgrade process when the hardware is available for installation on their vehicle. There are different versions of hardware required for vehicles that will be available at different times in early 2015, so it is important that customers first receive the communication from OnStar® to begin the upgrade process.
Refer to PI1533 for additional repair instructions that may be required for select models to ensure proper handsfree voice recognition performance.
Canadian OnStar® equipped vehicles travelling into the United States are to be serviced as would any U.S. vehicle while visiting, or relocating, to the United States. Follow normal diagnostic and repair procedures to support customer satisfaction regardless of vehicle point of origin.
SERVICE INFORMATION
Software Calibrations within the Procedures Below that MUST be Completed before Proceeding with this Bulletin:
Volt and ELR
- 2011-2014 Chevrolet Volt and 2014 Cadillac ELR - #PIC5920: Vehicle Will Not Charge And Hybrid Loss Of Isolation With DTC P0AA6 NOTE:
2011-2014 Chevrolet Volt and 2014 Cadillac ELR - the HPCM2 and BECM Must Be updated with the latest calibrations available on TIS2WEB prior to proceeding with OnStar® cellular communication upgrade. Use the unique labor operation in the #PIC5920.
- 2011-2012 Chevrolet Volt - #11342E: Customer Satisfaction - Enhancements for Side Impact Pole Performance
All Vehicles with Radio RPOs IO3, IO4, IO5, IO6, or (RAO - UA3)
- 2013-2015 Vehicles with radio RPOs IO3, IO4, IO5, IO6, or (RAO - UA3) (ATS Base Radio) - use latest version of PI1238: No XM on Start-Up when Manually Tuned and/or Using Voice Recognition, No Radio Wake-UpNOTE:
2013-2015 Vehicles with radio RPO's IO3, IO4, IO5, IO6, or (RAO-UA3) (ATS Base Radio) Ensure that the radio has the latest calibration available on TIS2WEB prior to proceeding with the OnStar® cellular communication upgrade. As stated in this PI, the "Audio Soft Version" label should be 000474 or lower before continuing. If version 000477 is already installed, reprogramming is not necessary. DO NOT reprogram. Software corruption may occur. Use the unique labor operation in the #PI1238.
SERVICE INFORMATION
Please Be Sure To Read These Important Guidelines:
- The customer must accept OnStar's "User Terms, Privacy Statement and Software Terms" in order to get the hardware upgrade. The customer can provide their acceptance at www.onstar.ca by logging into their OnStar® account.
- After accepting the OnStar® User Terms and Conditions the customer will need to call the OnStar® call center to begin the ordering process. English/French: 1-877-935-8717
- Some customers will be required to purchase a 1-year, non-refundable OnStar® Service Plan at the regular retail price (no discounts are available):
- 1-year OnStar Protection Plan: $249.90 + tax
- 1-year OnStar Security Plan: $299.90 + tax
- 1-year OnStar Guidance Plan: $399.90 + tax
- The 1-year OnStar® Service Plan is non-refundable or transferable to another person. Upgrades can apply unused subscription months to a new or Certified Pre-Owned OnStar® equipped GM vehicle purchase or lease prior to the expiration date.
- Hardware will be ordered and shipped to the customers selected dealer for installation.
- Hardware upgrade sets are VIN specific and must be installed on the vehicle that the set was ordered for.
- Actual odometer reading must be used on the Repair Order (RO).NOTE:
DO NOT estimate the odometer reading of the vehicle.
- Customers will receive a new Hands-Free Calling number once the new hardware is installed and configured.
- Any nametags that were stored in the old system will need to be reset by the subscriber once the new hardware is installed.
- Customers are responsible for the charges described in the communication from OnStar® regardless of whether their vehicle is in or out of the New Vehicle Warranty period. In addition, customer should not be charged labor costs. Dealers can charge GM the labor for the upgrade as specified at the end of this bulletin used the listed labor operation.
- All GM vehicles built in 2000 and after, and that are equipped with digital hardware, are eligible for an OnStar® hardware upgrade.
Aftermarket Equipment Installed
Prior to starting the upgrade the technician should inspect the radio to verify that the GM original equipment radio is present and functioning. If an aftermarket radio, navigation, amplifier, or bluetooth has been hard-wired into the vehicle, ensure that the Service Advisor is aware and the customer has approved to go ahead with the upgrade given the risk that their aftermarket accessory and/or OnStar® might not work after the upgrade has been completed.
The following statement was presented to the customer in their original offer communication.
"Vehicles equipped with hard-wired aftermarket electronic equipment, such as radios, receivers, navigation systems, amplifiers and bluetooth systems may not be compatible with the upgraded OnStar hardware. If this type of equipment is installed in your vehicle and you choose to upgrade your OnStar hardware, your OnStar® system and the aftermarket equipment may not operate after the upgrade, and you will be responsible for any extra costs associated with upgrading the vehicle's OnStar® hardware, including any costs to reverse the installation."
SERVICE INFORMATION
Part Ordering Process - Active OnStar® Subscribers
To upgrade their vehicle to an OnStar® 4GLTE (Generation 10) or 3G (Generation 9.4) system, the customer must do the following:
- Currently have an active OnStar® service plan.
- Have received an upgrade communication letter from OnStar®.NOTE:
OnStar® will communicate to subscribers when their specific hardware is available. Not all hardware types will be available at the start of the program.
- Go to the website www.onstar.ca and sign into their OnStar® Account to accept OnStar's "User Terms, Privacy Statement and Software Terms."
- Contact OnStar® to initiate the hardware order:
- "User Terms, Privacy Statement and Software Terms" must be accepted prior to ordering hardware.
- English/French 1-877-935-8717
- Purchase a one year (annual) service plan (as required) on the OnStar® website or through the OnStar® Advisor.
- Service Plan is non-refundable, when required.
- Current Basic Plan, 2014 Remotelink Key Fob Service, and Factory Trail Service customers may not require a commitment.
- Unused portions of the annual package is transferable to a new OnStar® 4G LTE equipped vehicle.
- Wait for selected Dealer to schedule an appointment with the customer.
Take the vehicle to the dealership on the appointment date for the hardware installation and activation.
SERVICE INFORMATION
Part Ordering Process and Hardware Installation - New Unsold Vehicles on Dealers Lot
- Dealers will automatically receive OnStar® hardware upgrade kits for affected dealer new vehicle inventory beginning spring 2015.NOTE:
Not all upgrade modules will be available at program launch, modules will be release for dealer inventory when they are available. Upgrade kits are VIN specific, installing a kit in another vehicle will cause configuration issues and might result in damaging the module.
- Dealer will be provided a summary by e-mail of the parts being shipped (FEDEX) to their dealership from York Electronics.NOTE:
On reviewing the list, if the vehicle is no longer in the dealer inventory (either due to sale or dealer trade) contact York by phone, e-mail, or fax to get a Return Material Authorization. Parts should not be forwarded to the dealer or installed in the customer's vehicle.
York Contact Information:
Eastern Canada
Phone: English 1-888-650-9675 ext. 307
Phone: French 1-888-650-9675 ext. 302
Fax: 1-888-650-9677
E-mail: info@yorkelec.com
Western Canada
Phone: 1-800-361-2894 ext. 1
Fax: 1-800-361-5396
E-mail: info@yorkelec.com
- Technician will install parts, program the module using Service Programming System (SPS) available on TIS2WEB and confirm connection.
- Service Technician will follow the installation instructions below.
- If successful, the technician will simply verify activation is complete.
Upon confirmation of successful hardware installation, apply the OnStar® 4G Wi-Fi sticker to the vehicle near the price and fuel economy label, the vehicle is ready for sale.
These vehicles will not behave exactly like those with factory installed modules. The OnStar® activation message will begin to play once the vehicle is driven 1.6km (1 mile) and will play at each key cycle until the vehicle is sold and the customer has accepted the OnStar® User Terms, Privacy Statement and Software Terms. For some vehicles the OnStar® icon on the radio display screen will be grayed out and inactive after the upgrade. This icon becomes active once an active OnStar® account is added to the vehicle. It is important to note that the Wi-Fi feature will be active and can be used in demonstrations.
SERVICE INFORMATION
Customer Hardware Upgrade
To complete the hardware upgrade for a customer's vehicle to an OnStar® 4G LTE (Generation 10) or 3G (Generation 9.4) system, the dealership will complete following below:
- Direct all customer questions to OnStar®.
- If the customer has received the upgrade letter and they have additional questions, they can call OnStar® at 1-877-935-8717 (English/French) or by pressing their blue button.
- Dealers will be notified daily by e-mail of orders placed for their dealership with related customer contact information.
- Dealers will contact the customer to schedule an appointment.
- Technician will verify VIN and customer information on Kit with VIN of installation vehicle (do not install hardware if VIN does not match).NOTE:
Installing the hardware in the wrong vehicle might damage the hardware.
- Tech will complete installation of hardware.
- Tech will use Service Programming System (SPS) to activate the hardware.
- The upgrade module can only communicate with the GDS2 diagnostic tool.
TIP: Some 2013 and prior vehicles are supported by the Tech2 diagnostic scan tools. The Tech2 is not capable of communicating with the upgraded OnStar® module. GDS2 must be utilized to perform diagnostics specific to the upgraded OnStar® system on these vehicles.
NOTE:It is important to correctly complete the following step in order to avoid manual configuration.
- Technician will verify VIN and customer information on Kit with VIN of installation vehicle (do not install hardware if VIN does not match).
- The technician will push the OnStar® Blue Button to confirm successful activation.
- Upon confirmation of successful activation, the vehicle is ready for customer pick up.
SOFTWARE ISSUES RELATED TO THIS BULLETIN:
Issue #1
Issue Description:
After Gen 9.4 CDMA EOL Upgrade the vehicle will not be capable of a door lock/unlock from an OnStar Advisor. Unlock service for the customer will be provided with Roadside Assistance, which is included in all paid OnStar Service Plans. There is no impact to customer key FOB functionality.
Cause:
The vehicle requires discrete signal to operate the door locks. This functionality was not turned on in the design of the hardware and cannot be fixed.
Customer Questions:
If the customer has further questions or concerns about the loss of the door lock/unlock functionality, they may call the OnStar CDMA End Of Life (EOL) Team at 877-935-8717.
IMPACTED VEHICLES
- 2003-2005 Buick Terraza
- 2003-2005 Chevrolet Venture
- 2003-2005 Oldsmobile Silhouette
- 2003-2005 Pontiac Montana
| Year | Make | Model |
| 2003 | Chevrolet | Venture |
| 2003 | Chevrolet | Venture AWD |
| 2003 | Oldsmobile | Silhouette |
| 2003 | Oldsmobile | Silhouette AWD |
| 2003 | Pontiac | Montana |
| 2003 | Pontiac | Montana AWD |
| 2004 | Chevrolet | Venture |
| 2004 | Oldsmobile | Silhouette |
| 2004 | Pontiac | Montana |
| 2005 | Buick | Terraza |
| 2005 | Chevrolet | Venture |
| 2005 | Pontiac | Montana |
| 2005 | Pontiac | Montana SV6 |
Issue #2
Issue Description:
After CDMA EOL Upgrade the vehicle's Driver Information Center may display a message stating "Phone Not Present." This message cannot be fixed/turned off permanently, but can be cleared on every ignition cycle. There is no impact to OnStar services or vehicle functionality in any way.
Cause:
The vehicle originally used a GM approved cell phone that could plug into the vehicle. That handset has been discontinued, and is thus not present. The functionality to disable the message was not included in the CDMA EOL upgrade programming.
Customer Questions:
If the customer has further questions or concerns about the error message, they may call the OnStar CDMA End Of Life (EOL) Team at 877-935-8717.
IMPACTED VEHICLES
- 2002-2005 Cadillac Seville, Deville and DHS
| Year | Make | Model |
| 2002 | Cadillac | Deville |
| 2002 | Cadillac | Deville DHS |
| 2002 | Cadillac | Deville DTS |
| 2002 | Cadillac | Seville SLS |
| 2002 | Cadillac | Seville STS |
| 2003 | Cadillac | Deville |
| 2003 | Cadillac | Deville Luxury |
| 2003 | Cadillac | Deville Touring |
| 2003 | Cadillac | Seville SLS |
| 2003 | Cadillac | Seville STS |
| 2004 | Cadillac | DHS |
| 2004 | Cadillac | Deville |
| 2004 | Cadillac | Seville |
| 2005 | Cadillac | DHS |
| 2005 | Cadillac | Deville |
Issue #3
Issue Description:
After CDMA EOL Upgrade, the vehicle will not receive Engine Oil Life data.
Cause:
The functionality design of the hardware does not support Onstar OVD email oil life data.
IMPACTED VEHICLES
- 2006 Buick Lucerne with 3.8 L26 V6 engine (models CX, CXL and CSX)
REPLACEMENT INSTRUCTIONS
For the HUMMER H2 MY 2003-2007 Follow the Instructions Listed Below:
-
NOTE:
Technician will verify VIN and customer information on Kit with VIN of installation vehicle (do not install hardware if VIN does not match.)
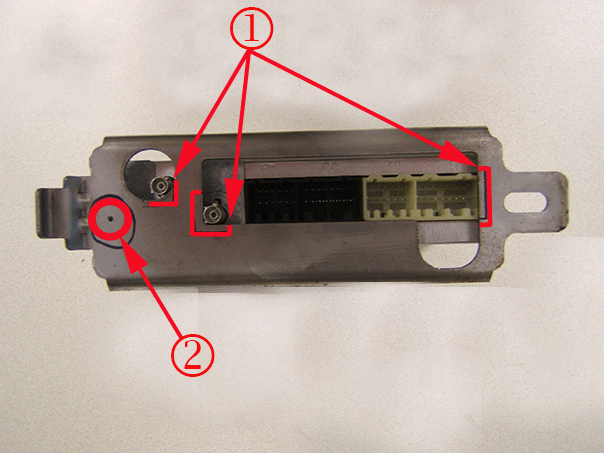
To access the OnStar® module, refer to the Service Information(SI) for the appropriate procedure.NOTE:After the removal of the original OnStar® module, modification of the new module is required to secure the module into place.
- Obtain two strips, approximately 177mm (7inches) in length, of 2" Velcro® 191195 Reclosable Loop Fastener Tape (hook and loop) or equivalent and apply one side of the tape to the bottom of the module as shown above.
- In the open space in the instrument panel (I/P), where the original module was, install on the bottom portion of I/P the other side of the 2" Velcro® 191195 Reclosable Loop Fastener Tape (hook and loop) or equivalent as shown above.
- Cover both sides of the module with BRS Tape KT13487 (1) or equivalent, as shown above.
- Cover the back of the module with 3M™ 4314 Urethane Foam ( 1/2 " x 7") or equivalent as shown above.
- Install the female to male cable (P/N 23242476) to the vehicles GPS antenna cable.
- Install the UHF adaptor cable (P/N 23242478) to the vehicle's cellular (purple) cable.
- Wrap the female to male cable and the UHF adaptor cable with 3M™ 4314 Urethane Foam Tape or equivalent to eliminate any potential noise as shown above.
- Transfer the Bluetooth Antenna, if equipped, to the new module.
- Connect the female to male cable (P/N 23242476) to the module's outboard connector (GPS).
- Connect the UHF adaptor cable (P/N 23242478) to the module's inboard connector (cellular).
- Secure the module to the recently installed Velcro® 191195 Reclosable Loop Fastener Tape (hook and loop) or equivalent inside the I/P as shown above. Ensure to position the cables out of the way of the module while installing.
- To reassemble the vehicle, refer to the Service Information (SI) for the appropriate procedure.
- To program the control module, perform the following procedure:
- Install EL-49642 SPS programming support tool.
-
NOTE:
Due to a change in SPS you must select 'Reprogram ECU', for Telematics Communication Interface Control Module Programming from the Selected Programming Process even if the unit is being replaced.
If 'Replace and Program ECU' is selected the Telematics Communication Interface Control Module will not be listed in the Supported Controllers screen. You must go back and select 'Reprogram ECU.'
In the SPS Supported Controllers screen, depending the model year, there will be one of three options that are listed below.Select the appropriate option for the vehicle:
- Mobile Telephone Communications Interface Control Module (Use ONLY per Bulletin 15-08-44-001)
- Telematics Communication Interface Control Module (Use ONLY per Bulletin 15-08-44-001)
- Vehicle Communication Interface Module (Use ONLY per Bulletin 15-08-44-001)
- Follow the on-screen instructions to complete programming. NOTE:
If there is a programming issue, please contact Techline Customer Support Center (TCSC) at 1-800-828-6860 (1-800-503-3222 for French).
- Turn the ignition to the OFF position and wait ten minutes.NOTE:
A 10 minute wait time is required to avoid configuration errors.
NOTE:Do NOT press the RED (OnStar® Emergency Button) at any time during the installation. This will cause module configuration issues.
If you inadvertently press the RED (OnStar® Emergency Button) during installation, you will not be able to complete the final configuration with the advisor until the next day.
- Turn the ignition to the ON position and press the OnStar® Blue Button to call OnStar®.NOTE:
The vehicle must be located in an area with a strong cellular network to perform this step.
IMPORTANT:The customer SHOULD NOT be the first one to press the OnStar® Blue Button after installation.
- The technician will hear a message stating "Hello and welcome to OnStar®. Your OnStar® account is currently inactive". Please push the OnStar® Blue Button again to activate your account, learn more about OnStar® services, or speak to an OnStar® Advisor.
- The technician will announce themselves by first name, dealership name and explain the vehicle has been upgraded for Canadian CDMA Transitions. NOTE:
During activation with the OnStar® Advisor, the French Language option may be requested.
- OnStar® advisor will confirm that the vehicle is set up correctly and if no issues were identified.
- If the OnStar® advisor identifies an issue they will complete a manual configuration while on the call. The technician will complete the manual configuration call with the OnStar® Advisor.
- The technician will need to provide the following information for a manual configuration:
- Customer Name
- Dealer Code with Division
- Vehicle VIN or:
- OnStar® Account Number
- Old STID - located on the label of the original module (for customer vehicles this is also located on the Upgrade kit packing slip)
- Customer Phone Number
- The technician will need to provide the following information for a manual configuration:
- Upon confirmation of successful hardware installation, the procedure is complete.


SERVICE INFORMATION
For Vehicle MY 2005-2010 Vibe, Follow the Instructions Listed Below:
-
NOTE:
Technician will verify VIN and customer information on Kit with VIN of installation vehicle (do not install hardware if VIN does not match)
IMPORTANT:Certain OnStar® equipped vehicles may be equipped with a back-up battery. The back-up battery is a non-rechargeable, lithium battery intended to provide an auxiliary power source for the telematics communication interface module in the event of a vehicle collision where power from the main vehicle battery is lost. Disconnecting power to the OnStar® module in any way while the ignition is ON or with retained accessory power (RAP) activated may cause activation of the OnStar® Back-Up Battery. Once the Back-Up Battery is activated it will stay on until the power is restored back to the telematics communication interface control module. The back-up battery is not rechargeable and once discharged below a specified voltage threshold the back-up battery must be replaced.
- MAKE SURE IGNITION IS OFF AND RAP IS DEACTIVATED PRIOR TO REMOVAL OF THE ONSTAR® MODULE.
To access the OnStar® module, refer to the Service Information(SI) for the appropriate procedure. - If installing the modules P/N 23230482, 23230536, 23230537, 23235220, 23235227, 23235234 and 23383877, transfer the Bluetooth Antenna(1), if equipped, to the new module.NOTE:
- During the installation of the OnStar® 3G/4G LTE module there may be interference with the module to the bracket not allowing the module to fully seat into place. If this occurs please refer to the "OnStar® Module Bracket Modification" section at the end of this bulletin.
- Some modules are not as thick as the original modules and require installation of foam to the mounting bracket to prevent movement of the module. Refer to the OnStar® Bracket Modification" section at the end of this bulletin.
- For labor time adjustment for the modification, please refer to the "OnStar® Bracket Modification" section at the end of this bulletin for information.
NOTE:For all other module P/Ns the Bluetooth Antenna is not required and may be discarded.
- Install the new module and connect the electrical connectors as necessary.
-
NOTE:
The vehicle may have two different configurations, with or without UHF cable. Use the appropriate procedure below:
If the vehicle requires a UHF adaptor cable (P/N 23242478) proceed with this step:- Install the UHF adapter cable (P/N 23242478) to the antenna connector(1) of the module.
- Install the female to male cable (P/N 23242476) to the module(2).
- Connect the UHF adapter(1) and the female to male(2) connector to the vehicle cables.
- If the vehicle does not require a UHF adaptor cable (P/N 23242478) proceed with this step:
- Install one female to male cable (P/N 23242476) to the antenna connector of the module(1).
- Install one female to male cable (P/N 23242476) to the module connector(2).
- Connect both female to male cables to the vehicle cables.
- To reassemble the vehicle, refer to the Service Information (SI) for the appropriate procedure.
- To program the control module, perform the following procedure:IMPORTANT:
Verify the battery voltage is more than 12 volts but less than 16 volts before proceeding with reprogramming. The battery must be fully charged BEFORE reprogramming.
IMPORTANT:During reprogramming, the battery voltage must be maintained within the proper range of 12-15.5 volts. CONNECT the approved Midtronics® PSC 550 Battery Maintainer (SPS Programming Support Tool (EL-49642) to the vehicle or the GR8 (EL50313) in the power supply mode.
- 2005-2010 Vibe Programming Instructions IMPORTANT:
The EL-49642 SPS programming support tool cannot be used to program the new Telematics Communication Interface Control Module on Vibe vehicles. The following steps are required to complete the programming of the new module. The new module programming will be performed by on OnStar over-the-air.
- Ensure that the vehicle is in an area with good cellular coverage.
- Contact OnStar TAC at 1-800-263-7740 English or 1-800-263-7960 French, Option 4 (OnStar) for programming direction between hours of 8AM and 4PM EST. Have OnStar 3G/4G Upgrade Program Packing Slip available for reference.
- Complete instruction provide by OnStar advisor.
- Move to Step 9.


- 9.
Turn the ignition to the OFF position and wait ten minutes.NOTE:
A 10 minute wait time is required to avoid configuration errors.
NOTE:Do NOT press the RED (OnStar® Emergency Button) at any time during the installation. This will cause module configuration issues.
If you inadvertently press the RED (OnStar® Emergency Button) during installation you will not be able to complete the final configuration with the advisor until the next day.
- 10.
Turn the ignition to the ON position and press the OnStar® Blue Button to call OnStar®.NOTE:
The vehicle must be located in an area with a strong cellular network to perform this step.
IMPORTANT:The customer SHOULD NOT be the first one to press the OnStar® Blue Button after installation.
- 10.1. The technician will hear a message stating "Hello and welcome to OnStar®. Your OnStar® account is currently inactive". Please push the OnStar® Blue Button again to activate your account, learn more about OnStar® services, or speak to an OnStar® Advisor.
- 10.2.
The technician will announce themselves by first name, dealership name and explain the vehicle has been upgraded for Canadian CDMA Transitions. NOTE:
During activation with the OnStar® Advisor, the French Language option may be requested.
- 10.3. OnStar® advisor will confirm that the vehicle is set up correctly and if no issues were identified.
- 11. If the OnStar® advisor identifies an issue they will complete a manual configuration while on the call. The tech will complete the manual configuration call with the OnStar® Advisor.
- 11.1. The technician will need to provide the following information for a manual configuration:
- Customer Name
- Dealer Code with Division
- Vehicle VIN or:
- OnStar® Account Number
- Old STID - located on the label of the original module
- Customer Phone Number
- 12. Upon confirmation of successful hardware installation, the procedure is complete.
SERVICE INFORMATION
For Vehicle MY 2010 and Older, Follow the Instructions Listed Below:
-
NOTE:
Technician will verify VIN and customer information on Kit with VIN of installation vehicle (do not install hardware if VIN does not match)
IMPORTANT:Certain OnStar® equipped vehicles may be equipped with a back-up battery. The back-up battery is a non-rechargeable, lithium battery intended to provide an auxiliary power source for the telematics communication interface module in the event of a vehicle collision where power from the main vehicle battery is lost. Disconnecting power to the OnStar® module in any way while the ignition is ON or with retained accessory power (RAP) activated may cause activation of the OnStar® Back-Up Battery. Once the Back-Up Battery is activated it will stay on until the power is restored back to the telematics communication interface control module. The back-up battery is not rechargeable and once discharged below a specified voltage threshold the back-up battery must be replaced.
- MAKE SURE IGNITION IS OFF AND RAP IS DEACTIVATED PRIOR TO REMOVAL OF THE ONSTAR® MODULE.
To access the OnStar® module, refer to the Service Information(SI) for the appropriate procedure. - If installing the modules P/N 23230482, 23230536, 23230537, 23235220, 23235227, 23235234 and 23383877, transfer the Bluetooth Antenna(1), if equipped, to the new module.NOTE:
- During the installation of the OnStar® 3G/4G LTE module there may be interference with the module to the bracket not allowing the module to fully seat into place. If this occurs please refer to the "OnStar® Module Bracket Modification" section at the end of this bulletin.
- Some modules are not as thick as the original modules and require installation of foam to the mounting bracket to prevent movement of the module. Refer to the OnStar® Bracket Modification" section at the end of this bulletin.
- For labor time adjustment for the modification, please refer to the "OnStar® Bracket Modification" section at the end of this bulletin for information.
NOTE:For all other module P/Ns the Bluetooth Antenna is not required and may be discarded.
-
IMPORTANT:
Vehicles with voice recognition systems may have a performance issue after the upgrade. " PI1533 - Poor Radio Hands-free Voice Recognition Performance " is required to prevent this issue.
Vehicles with Bluetooth or Navigation with RPOs (U3U, UZR, UUM, UH4, U2X, UY2, UAV, PCK, GQM,UYS,UFU+UP9, UEW), perform PI1533. - Install the new module and connect the electrical connectors as necessary.
-
NOTE:
The vehicle may have two different configurations, with or without UHF cable. Use the appropriate procedure below:
If the vehicle requires a UHF adaptor cable (P/N 23242478) proceed with this step:- Install the UHF adapter cable (P/N 23242478) to the antenna connector(1) of the module.
- Install the female to male cable (P/N 23242476) to the module(2).
- Connect the UHF adapter(1) and the female to male(2) connector to the vehicle cables.
- If the vehicle does not require a UHF adaptor cable (P/N 23242478) proceed with this step:
- Install one female to male cable (P/N 23242476) to the antenna connector of the module(1).
- Install one female to male cable (P/N 23242476) to the module connector(2).
- Connect both female to male cables to the vehicle cables.
- To reassemble the vehicle, refer to the Service Information (SI) for the appropriate procedure.
- To program the control module, perform the following procedure:IMPORTANT:
Verify the battery voltage is more than 12 volts but less than 16 volts before proceeding with reprogramming. The battery must be fully charged BEFORE reprogramming.
IMPORTANT:During reprogramming, the battery voltage must be maintained within the proper range of 12-15.5 volts. CONNECT the approved Midtronics® PSC 550 Battery Maintainer (SPS Programming Support Tool (EL-49642) to the vehicle or the GR8 (EL50313) in the power supply mode.
- Install EL-49642 SPS programming support tool.
-
NOTE:
Due to a change in SPS you must select 'Reprogram ECU', for Telematics Communication Interface Control Module Programming from the Selected Programming Process even if the unit is being replaced.
If 'Replace and Program ECU' is selected the Telematics Communication Interface Control Module will not be listed in the Supported Controllers screen. You must go back and select 'Reprogram ECU.'
In the SPS Supported Controllers screen, depending the model year, there will be one of three options that are listed below.Select the appropriate option for the vehicle:
- Mobile Telephone Communications Interface Control Module (Use ONLY per Bulletin 15-08-44-001)
- Telematics Communication Interface Control Module (Use ONLY per Bulletin 15-08-44-001)
- Vehicle Communication Interface Module (Use ONLY per Bulletin 15-08-44-001)
- Follow the on-screen instructions to complete programming. NOTE:
If there is a programming issue, please contact Techline Customer Support Center (TCSC) at 1-800-828-6860 (1-800-503-3222 for French).
- Review table below for specific module/vehicle configuration steps.
| Item | Steps |
|---|---|
| Step 9a
. P/Ns 23230538, 23232607, 23233066 or 84021666, 23230483 or 84021667 ONLY (GEN 10 modules) |
Important:
Failure to perform this step may result in an "Engine Power Reduced" message on DIC or "Check Engine light illumination" while maintaining normal engine performance. This may occur immediately after an OnStar blue button press configuration or soon afterwards. Perform Remote Vehicle Speed Limiting Reset using GDS2 as follows: (GEN 10 modules only, see note above). → Navigation path for vehicles with GDS2 support for ALL vehicle modules: - Module Diagnostics | Telematics Communication Interface Module | Configuration/Reset Functions | Remove/Reset Module | Remote Vehicle Speed Limiting Reset → Navigation path for vehicles with GDS2 support for the OnStar module ONLY (all other module communications remain supported by Tech 2 (refer to Bulletin 15-08-73-001) - Additional Options | OnStar Canada GSM | Module Diagnostics | Telematics Communication Interface Module | Configuration/Reset Functions | Remove/Reset Module | Remote Vehicle Speed Limiting Reset |
| Step 9b
. Vehicles with a "glass" mounted OnStar antenna ONLY. |
Important:
This step should not be performed for vehicles with a "roof" mounted antenna. Important: Failure to perform the Window Antenna Calibration steps may result in the OnStar system status displaying a "Red light" indicating a problem. (Blue OnStar button operates normally) Perform Mobile Telephone Antenna Setup using GDS2 as follows: (required for vehicles equipped with a "Glass" mounted OnStar antenna, see note above). → Navigation path for vehicles with GDS2 support for the OnStar module ONLY (all other module communications remain supported by Tech 2 (refer to Bulletin 15-08-73-001) - Additional Options | OnStar Canada GSM | Module Diagnostics | Telematics Communication Interface Module | Configuration/Reset Functions | Remove/Reset Module | Mobile Telephone Antenna Setup
IMPORTANT:
Back out of the scan tool page and perform a power cycle of the OnStar module by disconnecting it or pulling the fuse |
- 10.
Turn the ignition to the OFF position and wait ten minutes.NOTE:
A 10 minute wait time is required to avoid configuration errors.
NOTE:Do NOT press the RED (OnStar® Emergency Button) at any time during the installation. This will cause module configuration issues.
If you inadvertently press the RED (OnStar® Emergency Button) during installation you will not be able to complete the final configuration with the advisor until the next day.
- 11.
Turn the ignition to the ON position and press the OnStar® Blue Button to call OnStar®.NOTE:
The vehicle must be located in an area with a strong cellular network to perform this step.
IMPORTANT:The customer SHOULD NOT be the first one to press the OnStar® Blue Button after installation.
- 11.1. The technician will hear a message stating "Hello and welcome to OnStar®. Your OnStar® account is currently inactive". Please push the OnStar® Blue Button again to activate your account, learn more about OnStar® services, or speak to an OnStar® Advisor.
- 11.2.
The technician will announce themselves by first name, dealership name and explain the vehicle has been upgraded for Canadian CDMA Transitions. NOTE:
During activation with the OnStar® Advisor, the French Language option may be requested.
- 11.3. OnStar® advisor will confirm that the vehicle is set up correctly and if no issues were identified.
- 12. If the OnStar® advisor identifies an issue they will complete a manual configuration while on the call. The tech will complete the manual configuration call with the OnStar® Advisor.
- 12.1. The technician will need to provide the following information for a manual configuration:
- Customer Name
- Dealer Code with Division
- Vehicle VIN or:
- OnStar® Account Number
- Old STID - located on the label of the original module
- Customer Phone Number
- 13. Upon confirmation of successful hardware installation, the procedure is complete.
SERVICE INFORMATION
For Vehicle MY 2011 and Above, Follow the Instructions Listed Below:
-
NOTE:
- 2013-2015 Vehicles with radio RPO's IO3, IO4, IO5, IO6, or (RAO-UA3) (ATS Base Radio) Ensure that the radio has the latest calibration available on TIS2WEB prior to proceeding with the OnStar® cellular communication upgrade. As stated previously in this bulletin, the "Audio Soft Version" label should be 000474 or lower before continuing. If version 000477 is already installed, reprogramming is not necessary. DO NOT reprogram. Software corruption may occur.IMPORTANT:
The radio calibration update will erase or reset some customer radio and/or vehicle settings to factory default.
- The colors of the cable in the images in the instructions listed below may not depict the colors of the cables received. The use of colored cables are for illustration purposes only. Technician will verify VIN and customer information on Kit with VIN of installation vehicle (do not install hardware if VIN does not match).
IMPORTANT:Certain OnStar® equipped vehicles may be equipped with a back-up battery. The back-up battery is a non-rechargeable, lithium battery intended to provide an auxiliary power source for the telematics communication interface module in the event of a vehicle collision where power from the main vehicle battery is lost. Disconnecting power to the OnStar® module in any way while the ignition is ON or with retained accessory power (RAP) activated may cause activation of the OnStar® Back-Up Battery. Once the Back-Up Battery is activated it will stay on until the power is restored back to the telematics communication interface control module. The back-up battery is not rechargeable and once discharged below a specified voltage threshold the back-up battery must be replaced.
- MAKE SURE IGNITION IS OFF AND RAP IS DEACTIVATED PRIOR TO REMOVAL OF THE ONSTAR® MODULE.
To access the OnStar® module, refer to the Service Information (SI) for the appropriate procedure. - 2013-2015 Vehicles with radio RPO's IO3, IO4, IO5, IO6, or (RAO-UA3) (ATS Base Radio) Ensure that the radio has the latest calibration available on TIS2WEB prior to proceeding with the OnStar® cellular communication upgrade. As stated previously in this bulletin, the "Audio Soft Version" label should be 000474 or lower before continuing. If version 000477 is already installed, reprogramming is not necessary. DO NOT reprogram. Software corruption may occur.
- If installing the modules P/N 23230482, 23230536, 23230537, 23235220, 23235227, 23235234 and 23383877, transfer the Bluetooth Antenna(1), if equipped, or supplied (2012 Colorado/Canyon, P/N15938939) to the new module. Refer to Wireless Communication Interface Antenna Replacement
in SI.NOTE:
- During the installation of the OnStar® 3G/4G LTE module there may be interference with the module to the bracket not allowing the module to fully seat into place. If this occurs please refer to the "OnStar® Module Bracket Modification" section at the end of this bulletin.
- Some modules are not as thick as the original modules and require installation of foam to the mounting bracket to prevent movement of the module. Refer to the "OnStar® Bracket Modification" section at the end of this bulletin
- For labor time adjustment for the modification, please refer to the "OnStar® Bracket Modification" section at the end of this bulletin for information.
NOTE:For all other module P/Ns the Bluetooth Antenna is not required and may be discarded.
- Install the new module and connect the electrical connectors as necessary.
- Connect the male to male cable (P/N 23310710 ) to the cellular connector(1) to the splitter as shown above.NOTE:
During installation of the antenna cable and the cellular cable to the splitter, if the cables inadvertently become incorrectly installed, the technician may notice a red LED with DTCs B101D-3C and B101D-F0 set as current in the OnStar VCIM.
NOTE:The "upgrade" splitter is an additional piece of hardware and must be installed at the VCIM. If present, DO NOT remove any existing splitters during installation.
- Connect the male to male cable (P/N 23242477) to the GPS connector(2) to the splitter as shown above.
- Connect the antenna cable (1) from the vehicle to the "upgrade" splitter (2).
- If no mounting location for the splitter, secure the splitter(1) to the vehicle to prevent a rattle or damage to the splitter.
- To reassemble the vehicle, refer to the Service Information (SI) for the appropriate procedure.
-
IMPORTANT:
Verify the battery voltage is more than 12 volts but less than 16 volts before proceeding with reprogramming. The battery must be fully charged BEFORE reprogramming.
IMPORTANT:During reprogramming, the battery voltage must be maintained within the proper range of 12-15.5 volts. CONNECT the approved Midtronics® PSC 550 Battery Maintainer (SPS Programming Support Tool (EL-49642) to the vehicle or the GR8 (EL50313) in the power supply mode.
To program the control module, perform the following procedure:- Install EL-49642 SPS programming support tool .
-
NOTE:
Due to a change in SPS you must select 'Reprogram ECU', for Telematics Communication Interface Control Module Programming from the Selected Programming Process even if the unit is being replaced.
If 'Replace and Program ECU' is selected the Telematics Communication Interface Control Module will not be listed in the Supported Controllers screen. You must go back and select 'Reprogram ECU.'
In the SPS Supported Controllers screen, depending the model year, there will be one of three options that are listed below.Select the appropriate option for the vehicle:
- Mobile Telephone Communications Interface Control Module (Use ONLY per Bulletin 15-08-44-001)
- Telematics Communication Interface Control Module (Use ONLY per Bulletin 15-08-44-001)
- Vehicle Communication Interface Module (Use ONLY per Bulletin 15-08-44-001)
- Follow the on-screen instructions to complete programming. NOTE:
If there is a programming issue, please contact Techline Customer Support Center (TCSC) at 1-800-828-6860 (1-800-503-3222 for French).
-
NOTE:
Step 10 is an additional step required for GEN 10 modules ONLY (module P/Ns 23230538, 23232607, 23233066 or 84021666, 23230483 or 84021667).
IMPORTANT:Failure to perform this step may result in an "Engine Power Reduced" message on DIC or "Check Engine light illumination" while maintaining normal engine performance. This may occur immediately after an OnStar blue button press configuration or soon afterwards
Perform Remote Vehicle Speed Limiting Reset using GDS2 as follows: (GEN 10 modules only, see note above).- Navigation path for vehicles with GDS2 support for ALL vehicle modules:
- Module Diagnostics | Telematics Communication Interface Module | Configuration/Reset Functions | Remove/Reset Module | Remote Vehicle Speed Limiting Reset
- Navigation path for vehicles with GDS2 support for the OnStar module ONLY (all other module communications remain supported by Tech 2 (refer to Bulletin 15-08-73-001)
- Additional Options | OnStar Canada GSM | Module Diagnostics | Telematics Communication Interface Module | Configuration/Reset Functions | Remove/Reset Module | Remote Vehicle Speed Limiting Reset
- Turn the ignition to the OFF position and wait ten minutes.NOTE:
A 10 minute wait time is required to avoid configuration errors.
NOTE:Do NOT press the RED (OnStar® Emergency Button) at anytime during the installation. This will cause module configuration issues.
If you inadvertently press the RED (OnStar® Emergency Button) during installation you will not be able to complete the final configuration with the advisor until the next day.
- Turn the ignition to the ON position and press the OnStar® Blue Button to call OnStar®.NOTE:
The vehicle must be located in an area with a strong cellular network to perform this step.
IMPORTANT:The customer SHOULD NOT be the first one to press the OnStar® Blue Button after installation.
- The technician will hear a message stating "Hello and welcome to OnStar®. Your OnStar® account is currently inactive". Please push the OnStar® Blue Button again to activate your account, learn more about OnStar® services, or speak to an OnStar® Advisor.
- The technician will announce themselves by first name, dealership name and explain the vehicle has been upgraded for Canadian CDMA Transitions.
If the vehicle is a new unsold unit, inform the advisor so the OnStar® demo setting is initiated.NOTE:
During activation with the OnStar® Advisor, the French Language option may be requested.
- OnStar® advisor will confirm that the vehicle is set up correctly and if no issues were identified
- If the OnStar® advisor identifies an issue they will complete a manual configuration while on the call. The technician will complete the manual configuration call with the OnStar® Advisor.
- The technician will need to provide the following information for a manual configuration:
- Customer Name
- Dealer Code with Division
- Vehicle VIN or:
- OnStar® Account Number
- Old STID - located on the label of the original module
- Customer Phone Number
- The technician will need to provide the following information for a manual configuration:
- Upon confirmation of successful hardware installation, the procedure is complete unless the vehicle is an unsold vehicle on a dealer lot, proceed to the next step.
- Apply the OnStar® 4G Wi-Fi sticker to the vehicle near the price and fuel economy label, the vehicle is ready for sale.


PARTS INFORMATION
| Vehicle Line and Model Year |
Module Part Number |
Model Year 2011 & Above |
Model Year 2010 & Under |
|||
| Splitter | Male to Male Universal | Male to Male Keyed |
Female to Male Cable | UHF Adaptor Cable | ||
| Buick Allure 2005-2009 |
23230482 | 23242476 | 23242478 | |||
| Buick Century 2004 |
23230482 | 23242476 | 23242478 | |||
| Buick Enclave 2008-2015 |
23233066 or 84021666 | 23242479 | 23242477 | 23310710 | 23242476 (2X) |
|
| Buick Encore 2013-2014 |
23230538 | 23242479 | 23242477 | 23310710 | ||
| Buick LaCrosse 2005-2009 |
23230482 | 23242476 | 23242478 | |||
| Buick LaCrosse 2010-2014 |
23230538 | 23242479 | 23242477 | 23310710 | 23242476 (2X) |
|
| Buick LeSabre 2000-2005 |
23230482 | 23242476 | 23242478 | |||
| Buick Lucerne 2006-2011 |
23230483 or 84021667 | 23242479 | 23242477 | 23310710 | 23242476 (2X) |
|
| Buick Rainier 2004-2007 |
23235234 | 23242476 | 23242478 | |||
| Buick Regal 2004 |
23230482 | 23242476 | 23242478 | |||
| Buick Regal 2011-2014 |
23230538 | 23242479 | 23242477 (May require 90 degree cable 13581153) |
23310710 | 23242476 (2X for 2011 MY without RPO AUA) |
|
| Buick Rendezvous 2003-2007 |
23235234 | 23242476 | 23242478 | |||
| Buick Terraza 2005-2007 |
23235234 | 23242476 | 23242478 | |||
| Buick Verano 2012-2014 |
23230538 | 23242479 | 23242477 (May require 90 degree cable 13581153) |
23310710 | ||
| Cadillac ATS 2013-2014 |
23232607 | 23242479 | 23242477 | 23310710 | ||
| Cadillac CTS 2003-2007 |
23230482 | 23242476 | 23242478 | |||
| Cadillac CTS 2008-2010 |
23230483 or 84021667 | 23242476 (2X) | ||||
| Cadillac CTS Sedan 2011-2013 |
23230483 or 84021667 | 23242479 | 23242477 | 23310710 | ||
| Cadillac CTS Sedan 2014 |
23232607 | 23242479 | 23242477 | 23310710 | ||
| Cadillac CTS except Sedan |
2008-2015 | |||||
| 23230483 or 84021667 | 23242479 | 23242477 | 23310710 | 23242476 | 23242478 | |
| 2003-2007 | ||||||
| 23230482 | 23242476 | 23242478 | ||||
| Cadillac DeVille DHS/DTS 2002-2005 |
23235234 | 23242476 | 23242478 | |||
| Cadillac DTS 2006-2011 |
23230483 or 84021667 | 23242479 | 23242477 | 23310710 | 23242476 (2X) |
|
| Cadillac ELR* 2014 |
23230538 | 23242479 | 23242477 | 23310710 | ||
| Cadillac Escalade Models | 2015 | |||||
| 23230538 | 23242479 | 23242477 | 23310710 | |||
| 2007-2014 | ||||||
| 23233066 or 84021666 | 23242479 | 23242477 | 23310710 | 23242476 (2X) |
||
| 2003-2006 | ||||||
| 23230482 | 23242476 | 23242478 | ||||
| Cadillac Funeral Coach 2007-2010 |
23230483 or 84021667 | 23242476 (2X) |
||||
| Cadillac Funeral Coach 2011 |
23230483 or 84021667 | 23242479 | 23242477 | 23310710 | 23242476 (2X) |
|
| Cadillac Funeral Coach 2013-2015 |
23230538 | 23242479 | 23242477 | 23310710 | 23242476 (2X) |
|
| Cadillac Limousine | 23230483 or 84021667 | 23242479 | 23242477 | 23310710 | 23242476 (2X) |
|
| Cadillac Seville SLS/STS 2002-2003 |
23235234 | 23242476 | 23242478 | |||
| Cadillac SRX | 2013-2014 | |||||
| 23232607 | 23242479 | 23242477 | 23310710 | 23242476 (2X) |
||
| 2010-2012 | ||||||
| 23230538 | 23242479 | 23242477 | 23242477 | 23242476 (2X) |
||
| 2007-2009 | ||||||
| 23230483 or 84021667 | 23242476 (2X) |
|||||
| 2004-2006 | ||||||
| 23235234 | 23242476 | 23242478 | ||||
| Cadillac STS 2005-2011 |
23235227 | 23242476 | 23242478 | |||
| Cadillac XLR Roadster 2004-2009 |
23230536 | 23242476 | 23242478 | |||
| Cadillac XTS 2013-2014 |
23230538 | 23242479 | 23242477 | 23310710 | ||
| Chevrolet Avalanche | 2007-2013 | |||||
| 23233066 or 84021666 | 23242479 | 23242477 | 23310710 | 23242476 (2X) |
||
| 2003-2006 | ||||||
| 23235234 | ||||||
| Chevrolet Aveo 2009-2011 |
23230483 or 84021667 | 23242476 (2X) |
||||
| Chevrolet Camaro 2010-2015 |
23230538 | 23242479 | 23242477 | 23310710 | 23242476 (2X) |
|
| Chevrolet Captiva (VIN L) 2012-2015 |
23230483 or 84021667 | 23242479 | 23242477 | 23310710 | ||
| Chevrolet Cavalier 2004 |
23235234 | 23242476 | 23242478 | |||
| Chevrolet Cobalt 2005-2010 |
23235220 | 23242476 | 23242478 | |||
| Chevrolet Colorado 2004-2012 |
23235234 | 23242479 | 23242477 | 23310710 | 23242476 | 23242478 |
| Chevrolet Colorado 2012 |
Bluetooth Antenna 15938939 |
|||||
| Chevrolet Corvette | 2014 | |||||
| 23230538 | 23242479 | 23242477 | 23310710 | |||
| 2007-2008 Z06 and 2009-2013 All Models | ||||||
| 23230536 | 23242479 | 23242477 | 23310710 | 23242476 | 23242478 | |
| 2005-2008 Coupe and Convertible | ||||||
| 23230537 | 23242479 | 23310710 | 23242476 | 23242478 | ||
| Chevrolet Cruze 2011-2014 |
23230538 | 23242479 | 23242477 | 23310710 | ||
| Chevrolet Equinox | 2010-2014 | |||||
| 23232607 | 23242479 | 23242477 | 23310710 | 23242476 (2X) |
||
| 2007-2009 | ||||||
| 23230483 or 84021667 | 23242476 (2X) |
|||||
| 2005-2006 | ||||||
| 23399653 | 23242476 | 23242478 | ||||
| Chevrolet Express | 2011-2015 | |||||
| 23233066 or 84021666 | 23242479 | 23242477 | 23310710 | |||
| 2004-2005 | ||||||
| 23230482 | 23242476 | 23242478 | ||||
| Chevrolet HHR 2006-2011 |
23235227 | 23242476 | 23242478 | |||
| Chevrolet Impala | 2014 | |||||
| 23232607 | 23242479 | 23242477 | 23310710 | |||
| 2006-2013 | ||||||
| 23230483 or 84021667 | 23242479 | 23242477 | 23310710 | 23242476 (2X) |
||
| 2001-2005 | ||||||
| 23230482 | 23242476 | 23242478 | ||||
| Chevrolet Malibu | 2013-2014 | |||||
| 23230538 | 23242479 | 23242477 | 23310710 | |||
| 2004-2012 | ||||||
| 23235227 | 23242479 | 23242477 | 23310710 | 23242476 | 23242478 | |
| Chevrolet Monte Carlo |
2006-2007 | |||||
| 23230483 or 84021667 | 23242476 (2X) |
|||||
| 2001-2005 | ||||||
| 23230482 | 23242476 | 23242478 | ||||
| Chevrolet Orlando 2011-2014 |
23230538 | 23242479 | 23242477 | 23310710 | ||
| Chevrolet SS 2014 |
23230538 | 23242479 | 23242477 | 23310710 | 23242476 (2X) |
|
| Chevrolet Silverado | 2014 Silverado 1500 and 2015 Silverado 2500/3500 | |||||
| 23230538 | 23242479 | 23242477 | 23310710 | |||
| 2007-2013 Silverado and 2014 Silverado 2500/3500 | ||||||
| 23233066 or 84021666 | 23242479 | 23242477 | 23310710 | 23242476 (2X) |
||
| 2003-2006 Silverado and 2007 Silverado Classic | ||||||
| 23230482 | 23242476 | 23242478 | ||||
| Chevrolet Sonic 2012-2014 |
23230538 | 23242479 | 23242477 | 23310710 | ||
| Chevrolet Spark 2013-2014 |
23232607 | 23242479 | 23242477 | 23310710 | ||
| Chevrolet Suburban | 2015 | |||||
| 23230538 | 23242479 | 23242477 | 23310710 | |||
| 2007-2014 | ||||||
| 23233066 or 84021666 | 23242479 | 23242477 | 23310710 | 23242476 (2X) |
||
| 2003-2006 | ||||||
| 23230482 | 23242476 | 23242478 | ||||
| Chevrolet Trail Blazer 2002-2009 |
23235234 | 23242476 | 23242478 | |||
| Chevrolet Tahoe | 2015 | |||||
| 23230538 | 23242479 | 23242477 | 23310710 | |||
| 2007-2014 | ||||||
| 23233066 or 84021666 | 23242479 | 23242477 | 23310710 | 23242476 (2X) |
||
| 2003-2006 | ||||||
| 23230482 | 23242476 | 23242478 | ||||
| Chevrolet Traverse 2009-2015 |
23233066 or 84021666 | 23242479 | 23242477 | 23310710 | 23242476 (2X) |
|
| Chevrolet Trax 2013-2014 |
23230538 | 23242479 | 23242477 | 23310710 | ||
| Chevrolet Uplander 2005-2009 |
23235234 | 23242476 | 23242478 | |||
| Chevrolet Venture 2003-2005 |
23235234 | 23242476 | 23242478 | |||
| Chevrolet Volt* 2011-2014 |
23230538 | 23242479 | 23242477 | 23310710 | ||
| GMC Acadia 2007-2015 |
23233066 or 84021666 | 23242479 | 23242477 | 23310710 | 23242476 (2X) |
|
| GMC Canyon 2004-2012 |
23235234 | 23242479 | 23242477 | 23310710 | 23242476 | 23242478 |
| GMC Canyon 2012 |
Bluetooth Antenna 15938939 |
|||||
| GMC Envoy 2002-2009 |
23235234 | 23242476 | 23242478 | |||
| GMC Savana | 2011-2015 | |||||
| 23233066 or 84021666 | 23242479 | 23242477 | 23310710 | 23242476 (2X) |
||
| 2004-2005 | ||||||
| 23230482 | 23242476 | 23242478 | ||||
| 2003 | ||||||
| 23230482 | 23242476 | 23242478 | ||||
| GMC Sierra Models | 2014 Sierra 1500 and 2015 Sierra 2500/3500 | |||||
| 23230538 | 23242479 | 23242477 | 23310710 | |||
| 2007-2013 Sierra and 2014 Sierra 2500/3500 | ||||||
| 23233066 or 84021666 | 23242479 | 23242477 | 23310710 | 23242476 (2X) |
||
| 2003-2006 Sierra and 2007 Sierra Classic | ||||||
| 23230482 | 23242476 | 23242478 | ||||
| GMC Terrain 2010-2014 |
23232607 | 23242479 | 23242477 | 23310710 | 23242476 (2X) |
|
| GMC Yukon Models |
2015 | |||||
| 23230538 | 23242479 | 23242477 | 23310710 | |||
| 2007-2014 | ||||||
| 23233066 or 84021666 | 23242479 | 23242477 | 23310710 | 23242476 (2X) |
||
| 2003-2006 | ||||||
| 23230482 | 23242476 | 23242478 | ||||
| HUMMER H2 | 2008-2010 | |||||
| 23233066 or 84021666 | 23242476 (2X) |
|||||
| 2003-2007 | ||||||
| 23235234 | 23242476 | 23242478 | ||||
| HUMMER H3 2006-2010 |
23235234 | 23242476 | 23242478 | |||
| Oldsmobile Aurora 2001-2003 |
23230482 | 23242476 | 23242478 | |||
| Oldsmobile Bravada 2002-2004 |
23235234 | 23242476 | 23242478 | |||
| Oldsmobile Silhouette 2003-2004 |
23235234 | 23242476 | 23242478 | |||
| Pontiac Aztek 2003-2005 |
23235234 | 23242476 | 23242478 | |||
| Pontiac Bonneville 2000-2005 |
23230482 | 23242476 | 23242478 | |||
| Pontiac G3 2009-2011 |
23230483 or 84021667 | |||||
| Pontiac G5 2007-2010 |
23235220 | 23242476 | 23242478 | |||
| Pontiac G6 2005-2010 |
23235227 | 23242479 | 23242477 | 23310710 | 23242476 | 23242478 |
| Pontiac G8 2008-2009 |
23233066 or 84021666 | 23242476 (2X) |
||||
| Pontiac Grand Prix 2004-2008 |
23383877 | 23242476 | 23242478 | |||
| Pontiac Montana/SV6 2003-2009 |
23235234 | 23242476 | 23242478 | |||
| Pontiac Pursuit 2005-2006 |
23235220 | 23242476 | 23242478 | |||
| Pontiac Solstice 2006-2010 |
23235227 | 23242476 | 23242478 | |||
| Pontiac Sunfire Coupe 2003-2005 |
23235234 | 23242476 | 23242478 | |||
| Pontiac Torrent | 2007-2009 | |||||
| 23230483 or 84021667 | 23242476 (2X) |
|||||
| 2006 | ||||||
| 23399653 | 23242476 | 23242478 | ||||
| Pontiac Vibe | 2009-2010 | |||||
| 23230483 or 84021667 | 23242476 (2X) |
|||||
| 2005-2008 | ||||||
| 23230482 | 23242476 | 23242478 | ||||
| Saturn Astra 2008-2009 |
23230537 | 23242476 | 23242478 | |||
| Saturn AURA 2007-2011 |
23235227 | 23242479 | 23242477 | 23310710 | 23242476 | 23242478 |
| Saturn ION 2004-2007 |
23235234 | 23242476 | 23242478 | |||
| Saturn L300 2002-2004 |
23230482 | 23242476 | 23242478 | |||
| Saturn OUTLOOK 2007-2010 |
23233066 or 84021666 | 23242476 (2X) |
||||
| Saturn RELAY 2005-2007 |
23235234 | |||||
| Saturn SKY 2007-2009 |
23235227 | 23242476 | 23242478 | |||
| Saturn VUE | 2008-2010 | |||||
| 23230483 or 84021667 | 23242476 (2X) |
|||||
| 2003-2007 | ||||||
| 23230482 | 23242476 | 23242478 | ||||
| *As stated in the Recommendation/Instructions of this bulletin, the #11342: Customer Satisfaction - Enhancements for Side Impact Pole Performance and #PIC5920: Vehicle Will Not Charge And Hybrid Loss Of Isolation With DTC P0AA6 must be completed on the Volt and ELR, if applicable, before proceeding with this bulletin. | ||||||
SERVICE INFORMATION
For product ordering information, call a local automotive equipment supplier or call Velcro at 800-683-5276, Kent Automotive at 1-800-563-1717 and 3M™ at 1-800-364-3577.
| Part Number | Description | Material Allowance |
|---|---|---|
| Velcro 191195* |
Velcro® Reclosable Loop Fastener Tape (hook and loop) 2in X 25yard |
$2.20 CAD (per vehicle) |
| KT13487** | BRS Tape KT13487 8in X 10in |
$3.25 CAD (per vehicle) |
| 4314*** | 3M™ Urethane Foam Tape 1/2in X 18yards, 1/4inch thick |
$0.90 CAD (per vehicle) |
| P46505> | Kent Automotive Adhesive-Back Shim Stock 3/4" Wide X 30 Feet X 7/16" Thick |
$1.50 CAD (per vehicle) |
| 130C< | Scotch™ (3M™) Linerless Rubber Splicing Tape 3/4in X 30Feet X .030in |
$0.80 (per vehicles) |
| *There is enough material to repair multiple vehicles. Store the remaining materials for future use. **There is enough material to repair approximately 8 vehicles. Store the remaining materials for future use. ***There is enough material to repair multiple vehicles. Store the remaining material for future use. >There is enough material to repair about 40 vehicles. Store the remaining material for future use. <There is enough material to repair about 40 vehicles. Store the remaining material for future use. |
||
SERVICE INFORMATION
Parts Issue (Defective, Damaged, Wrong Parts, Missing Parts, Dealer Trades)
Dealer should contact York Electronics by phone, e-mail, or fax:
Eastern Canada
Phone: English 1-888-650-9675 ext. 307
Phone: French 1-888-650-9675 ext. 302
Fax: 1-888-650-9677
E-mail: info@yorkelec.com
Western Canada
Phone: 1-800-361-2894 ext. 1
Fax: 1-800-361-5396
E-mail: info@yorkelec.com
SERVICE INFORMATION
Warranty Replacements
Article 1.1.3.1 Passenger Cars and Light Duty Trucks
Warranty Does Not Cover
- Condition resulting from negligence, alteration, accident or use for which the part or accessory was not designed or approved by GM;
- Parts and accessories used in racing or other competition;
- Loss of time, inconvenience, loss of use of the vehicle or other economic loss;
- Damage due to the lack of maintenance or use of wrong fluids, fuel, oil, refrigerant or lubricants.
Article 1.2.4.1 Service Agent Replacement Parts and Accessories Warranty Coverage
- GM warrants GM Service Replacement Parts and Accessories to the Service Agent, and it will pay Service Agent for repair or replacement of any defective or malfunctioning part or accessory. The Service Agent Parts and Accessories Warranty applies to all GM Parts and Accessories sold at retail by Service Agent, or used in warranty repairs.
- All new or remanufactured GM Parts and Accessories installed by Service Agent and used in New Vehicle Limited or Emission Warranty repairs are covered, parts and labour, for any remaining unused portion of the Vehicle or Emission Warranty or 12 months/20,000kms. Whichever is greater (12 months, regardless of odometer reading on medium duty trucks). For details see Article 1.1.3.NOTE:
Effective January 1, 2013 the mileage limitation was removed.
- All new or remanufactured GM Parts and Accessories installed by Service Agent and used in New Vehicle Limited or Emission Warranty repairs are covered, parts and labour, for any remaining unused portion of the Vehicle or Emission Warranty or 12 months/20,000kms. Whichever is greater (12 months, regardless of odometer reading on medium duty trucks). For details see Article 1.1.3.
SERVICE INFORMATION
Core Processing
- Cores are NOT to be returned to York Electronics.
- Parts are to be disposed as referenced in Article 1.7.3 of the Service Policies and Procedures Manual. NOTE:
After the 7-day retention period the old modules can be scrapped in the metal recycling or e-recycling as proscribed in your local area.
SERVICE INFORMATION
Claiming Information
| Labor Codes | Description |
|---|---|
| 0602058 | OnStar® 3G/4G Upgrade - Installation Labour |
| 0602068 | OnStar® 3G/4G Upgrade - Mobile Service Admin Allowance |
| 0602078 | OnStar® 3G/4G Upgrade - Courtesy Transportation |
OnStar® 3G/4G Upgrade Performed by Dealer Service Technician:
Labor Code 0602058: The component R&R labor time should be entered in the Base Labor Time field and the 0.2hr administrative allowance should be included in the Administration Time field. The $25 net amount should be submitted in the net item administrative allowance field. (The administrative allowance for electronic components exchanged through York is 0.2hr handling allowance and $25 net amount.) This net amount compensation is intended to compensate the Parts Department's effort during the exchange process. For further information, please refer to Article 1.5.10 of the Service Policies and Procedures Manual.
OnStar® 3G/4G Upgrade Performed by York Mobile Service:
For Canadian dealerships only (in Ontario using the York Mobile Service): In the event that a mobile service is provided at the dealership, the R&R labor time and the $25 net amount are NOT to be claimed; however, the 0.2hr administrative allowance is claimed once per warranty repair/exchange. (Labor Code 0602068)
SERVICE INFORMATION
Returning The Upgraded Vehicle To The Customer
Leave new OnStar® services information pamphlet in the vehicle.
LABOR TIME INFORMATION
| Labor Operation | Vehicle Line and Model Year | Labor Time |
| OnStar® Module Replacement and Cables Installation 0602058 |
Buick Allure 2005-2009 |
0.6 hr |
| Buick LaCrosse 2005-2009 |
0.6 hr | |
| Buick LaCrosse 2010-2014 |
Use Published Labor Operation Time for Labor Code: 3422790 | |
| Buick Century 2004 |
0.7 hr | |
| Buick Enclave 2008-2015 |
Use Published Labor Operation Time for Labor Code: 3422790 | |
| Buick Encore 2013-2014 |
Use Published Labor Operation Time for Labor Code: 3422790. Bracket Modification Add Time: 0.2 hr |
|
| Buick LeSabre 2000-2005 |
0.5 hr | |
| Buick Lucerne 2006 |
0.7 hr | |
| Buick Lucerne 2007-2011 |
Use Published Labor Operation Time for Labor Code: 3422790 | |
| Buick Rainier 2004-2007 |
0.6 hr | |
| Buick Regal 2004 |
0.7 hr | |
| Buick Regal 2011-2014 |
Use Published Labor Operation Time for Labor Code: 3422790 | |
| Buick Rendezvous 2003 |
1.0 hr** | |
| Buick Rendezvous 2004-2007 |
0.9 hr** | |
| Buick Terraza 2005-2007 |
0.9 hr** | |
| Buick Verano 2012-2014 |
Use Published Labor Operation Time for Labor Code: 3422790 | |
| Cadillac ATS 2013-2014 |
Use Published Labor Operation Time for Labor Code: 3422790 | |
| Cadillac CTS 2003-2007 |
0.7 hr | |
| Cadillac CTS Sedan 2014 |
Use Published Labor Operation Time for Labor Code: 3422790 | |
| Cadillac CTS (except Sedan) 2003-2007 |
0.7 hr | |
| Cadillac CTS (except Sedan) 2008-2015 |
Use Published Labor Operation Time for Labor Code: 3422790 | |
| Cadillac DeVille DHS/DTS 2002-2006 |
0.9 hr** | |
| Cadillac DTS 2007-2011 |
Use Published Labor Operation Time for Labor Code: 3422790 | |
| Cadillac ELR* 2014 |
Use Published Labor Operation Time for Labor Code: 3422790 | |
| Cadillac Escalade Models 2003-2006 |
1.0 hr | |
| Cadillac Escalade Models 2007-2015 |
Use Published Labor Operation Time for Labor Code: 3422790 | |
| Cadillac Funeral Coach 2007-2011 |
Use Published Labor Operation Time for Labor Code: 3422790 | |
| Cadillac Limousine | Use Published Labor Operation Time for Labor Code: 3422790 | |
| Cadillac Seville SLS/STS 2002-2003 |
0.8 hr | |
| Cadillac SRX 2004-2006 |
1.3 hrs | |
| Cadillac SRX 2007-2014 |
Use Published Labor Operation Time for Labor Code: 3422790 | |
| Cadillac STS 2005-2006 |
1.1 hrs | |
| Cadillac STS 2007-2011 |
Use Published Labor Operation Time for Labor Code: 3422790 | |
| Cadillac XLR Roadster 2004-2006 |
0.5 hr | |
| Cadillac XLR Roadster 2007-2009 |
Use Published Labor Operation Time for Labor Code: 3422790 | |
| Cadillac XTS 2013-2014 |
Use Published Labor Operation Time for Labor Code: 3422790 | |
| Chevrolet Avalanche 2003-2006 |
1.0 hr | |
| Chevrolet Avalanche 2007-2013 |
Use Published Labor Operation Time for Labor Code: 3422790 | |
| Chevrolet Aveo 2009-2011 |
Use Published Labor Operation Time for Labor Code: 3422790 | |
| Chevrolet Camaro 2010-2015 |
Use Published Labor Operation Time for Labor Code: 3422790 | |
| Chevrolet Captiva (VIN L) 2012-2015 |
Use Published Labor Operation Time for Labor Code: 3422790 | |
| Chevrolet Cavalier 2004 |
1.1 hrs | |
| Chevrolet Cobalt 2005-2006 |
1.2 hrs** | |
| Chevrolet Cobalt 2007-2010 |
Use Published Labor Operation Time for Labor Code: 3422790 Bracket Modification Add Time: 0.2 hr |
|
| Chevrolet Corvette 2005-2006 |
0.6 hr | |
| Chevrolet Corvette 2007-2014 |
Use Published Labor Operation Time for Labor Code: 3422790 | |
| Chevrolet Colorado 2004-2006 |
0.9 hr | |
| Chevrolet Colorado 2007-2012 |
Use Published Labor Operation Time for Labor Code: 3422790 Bracket Modification Add Time: 0.2 hr |
|
| Chevrolet Cruze 2011-2014 |
Use Published Labor Operation Time for Labor Code: 3422790 | |
| Chevrolet Equinox 2006 |
0.7 hr** | |
| Chevrolet Equinox 2007-2014 |
Use Published Labor Operation Time for Labor Code: 3422790 | |
| Chevrolet Express 2004-2005 |
0.5 hr | |
| Chevrolet Express 2011-2015 |
Use Published Labor Operation Time for Labor Code: 3422790 | |
| Chevrolet HHR 2006-2011 |
Use Published Labor Operation Time for Labor Code: 3422790 | |
| Chevrolet Impala 2001-2006 |
0.6 hr | |
| Chevrolet Impala 2007-2014 |
Use Published Labor Operation Time for Labor Code: 3422790 | |
| Chevrolet Malibu 2004-2006 |
1.7 hrs | |
| Chevrolet Malibu 2007-2014 |
Use Published Labor Operation Time for Labor Code: 3422790 | |
| Chevrolet Monte Carlo 2001-2007 |
0.6 hr | |
| Chevrolet Orlando 2011-2014 |
Use Published Labor Operation Time for Labor Code: 3422790 | |
| Chevrolet SS 2014 |
Use Published Labor Operation Time for Labor Code: 3422790 | |
| Chevrolet Silverado 2003-2006, 2007 (Classic) |
1.0 hr | |
| Chevrolet Silverado 2007 (New Style), 2008-2015 |
Use Published Labor Operation Time for Labor Code: 3422790 | |
| Chevrolet Sonic 2012-2014 |
Use Published Labor Operation Time for Labor Code: 3422790 | |
| Chevrolet Spark 2013-2014 |
Use Published Labor Operation Time for Labor Code: 3422790 | |
| Chevrolet Suburban 2003-2006 |
1.0 hr | |
| Chevrolet Suburban 2007-2015 |
Use Published Labor Operation Time for Labor Code: 3422790 | |
| Chevrolet TrailBlazer 2002-2009 |
0.6 hr | |
| Chevrolet Tahoe 2003-2006 |
0.6 hr | |
| Chevrolet Tahoe 2007-2015 |
Use Published Labor Operation Time for Labor Code: 3422790 | |
| Chevrolet Traverse 2009-2015 |
Use Published Labor Operation Time for Labor Code: 3422790 | |
| Chevrolet Trax 2013-2014 |
Use Published Labor Operation Time for Labor Code: 3422790 Bracket Modification Add Time: 0.2 hr |
|
| Chevrolet Uplander 2005-2009 |
0.9 hr** | |
| Chevrolet Venture 2003-2005 |
0.8 hr** | |
| Chevrolet Volt* 2011-2014 |
Use Published Labor Operation Time for Labor Code: 3422790 | |
| GMC Acadia 2007-2015 |
Use Published Labor Operation Time for Labor Code: 3422790 | |
| GMC Canyon 2004-2006 |
0.9 hr** | |
| GMC Canyon 2007-2012 |
Use Published Labor Operation Time for Labor Code: 3422790 Bracket Modification Add Time: 0.2 hr |
|
| GMC Envoy 2007-2009 2002-2006 |
0.6 hr | |
| GMC Savana 2003-2005 |
0.5 hr | |
| GMC Savana 2011-2015 |
Use Published Labor Operation Time for Labor Code: 3422790 | |
| GMC Sierra Models 2003-2006 |
1.0 hr | |
| GMC Sierra Models 2007-2015 |
Use Published Labor Operation Time for Labor Code: 3422790 | |
| GMC Terrain 2010-2014 |
Use Published Labor Operation Time for Labor Code: 3422790 | |
| GMC Yukon Models 2003-2006 |
1.0 hr | |
| GMC Yukon Models 2007-2015 |
Use Published Labor Operation Time for Labor Code: 3422790 | |
| OnStar® Module Replacement and Cables Installation 0602058 |
HUMMER H2 2003-2007 |
1.1 hrs |
| HUMMER H2 2008-2010 |
Use Published Labor Operation Time for Labor Code: 3422790 | |
| HUMMER H3 2006 |
0.7 hr | |
| HUMMER H3 2007-2010 |
Use Published Labor Operation Time for Labor Code: 3422790 | |
| Oldsmobile Aurora 2001-2003 |
0.5 hr | |
| Oldsmobile Bravada 2002-2004 |
0.6 hr | |
| Oldsmobile Silhouette 2003-2004 |
0.8 hr** | |
| Pontiac Aztek 2003 |
0.7 hr | |
| Pontiac Aztek 2004-2005 |
0.6 hr | |
| Pontiac Bonneville 2000-2005 |
0.5 hr | |
| Pontiac G3 2009-2011 |
Use Published Labor Operation Time for Labor Code: 3422790 | |
| Pontiac G5 2007-2010 |
Use Published Labor Operation Time for Labor Code: 3422790 Bracket Modification Add Time: 0.2 hr |
|
| Pontiac G6 2005-2006 |
1.7 hrs | |
| Pontiac G6 2007-2010 |
Use Published Labor Operation Time for Labor Code: 3422790 | |
| Pontiac G8 2008-2009 |
Use Published Labor Operation Time for Labor Code: 3422790 | |
| Pontiac Grand Prix 2004-2006 |
0.5 hr | |
| Pontiac Grand Prix 2007-2008 |
Use Published Labor Operation Time for Labor Code: 3422790 | |
| Pontiac Montana 2003-2005 |
0.8 hr** | |
| Pontiac Montana SV6 2005-2009 |
0.9 hr** | |
| Pontiac Pursuit 2005-2006 |
1.2 hrs** | |
| Pontiac Solstice 2006 |
0.8 hr | |
| Pontiac Solstice 2007-2010 |
Use Published Labor Operation Time for Labor Code: 3422790 | |
| Pontiac Sunfire Coupe 2003-2005 |
1.1 hrs | |
| Pontiac Torrent 2006 |
0.7 hr** | |
| Pontiac Torrent 2007-2009 |
Use Published Labor Operation Time for Labor Code: 3422790 | |
| Pontiac Vibe 2005-2006 |
0.6 hr | |
| Pontiac Vibe 2007-2010 |
Use Published Labor Operation Time for Labor Code: 3422790 | |
| Saturn Astra 2008-2009 |
Use Published Labor Operation Time for Labor Code: 3422790 Bracket Modification Add Time: 0.2 hr |
|
| Saturn AURA 2007-2011 |
Use Published Labor Operation Time for Labor Code: 3422790 | |
| Saturn ION 2004-2006 |
1.2 hrs | |
| Saturn ION 2007 |
Use Published Labor Operation Time for Labor Code: 3422790 | |
| Saturn L300 2002-2004 |
0.3 hr (Wagon) 0.2 hr (Except Wagon) |
|
| Saturn OUTLOOK 2007-2010 |
Use Published Labor Operation Time for Labor Code: 3422790 | |
| Saturn RELAY 2005-2007 |
0.9 hr** | |
| Saturn SKY 2007-2009 |
Use Published Labor Operation Time for Labor Code: 3422790 | |
| Saturn VUE 2003-2006 |
0.4 hr | |
| Saturn VUE 2007-2010 |
Use Published Labor Operation Time for Labor Code: 3422790 | |
| *As stated in the Recommendation/Instructions of this bulletin, the #11342: Customer Satisfaction - Enhancements for Side Impact Pole Performance and #PIC5920: Vehicle Will Not Charge And Hybrid Loss Of Isolation With DTC P0AA6 must be completed on the Volt and ELR, if applicable, before performing this bulletin. **Labor times have been adjusted to provide time allowance for bracket modification on these vehicles. |
||
ONSTAR® MODULE BRACKET MODIFICATION
During the installation of the OnStar® 3G/4G LTE module, there may be interference with the module to the bracket not allowing the module to fully seat into place.
Vehicles listed below may require bracket modifications. For early model vehicles (mostly model year 2007 and older), labor times have been adjusted to provide time allowance for bracket modification. For later model vehicles (mostly model year 2008 and newer), refer to the Labor Time Information section above to utilize "add time" when processing the transaction.
- Buick Encore (2012-2014)
- Buick Rendezvous (2003-2007)
- Buick Terraza (2005-2007)
- Cadillac DeVille/DHS/DTS (2002-2005)
- Chevrolet Cobalt (2005-2010)
- Chevrolet Colorado (2004-2012)
- Chevrolet Cruze (2011-2014)
- Chevrolet Equinox (2006)
- Chevrolet Trax (2013-2014)
- Chevrolet Uplander (2005-2009)
- Chevrolet Venture (2003-2005)
- GMC Canyon (2004-2012)
- Oldsmobile Silhouette (2003-2004)
- Pontiac G5 (2007-2010)
- Pontiac Montana (2003-2005)
- Pontiac Montana SV6 (2005-2009)
- Pontiac Pursuit (2005-2006)
- Pontiac Torrent (2006)
- Saturn Astra (2008-2009)
- Saturn RELAY (2005-2007)
SERVICE INFORMATION
Bracket Modification Instructions
Modification of the bracket and/or installation of material to the module may be required to secure the new 3G/4G LTE module into place.
Follow the appropriate instructions if this condition exists:
Buick Encore (2013-2014) / Chevrolet Trax (2013-2014)
After the original module and bracket is removed.

Remove the illustrated sections(1) of the bracket to allow the module's connectors access.

Secure the splitter to the side of the bracket as illustrated above.
- Install splitter to the hook(2) and position the splitter's connectors toward the module's connectors.
- Secure the splitter with nylon wire tie as illustrated. Trim the excess wire tie material.
Continue with the installation procedure.
Buick Rendezvous (2003-2007)
After the original module is removed.
Remove enough material(1) from the bracket to allow the new module connectors access through the bracket.
Drill a 22.25mm (7/8in) hole(2) as illustrated above to allow the module's connector access.

Wrap the new module with Scotch™ Linerless Rubber Splicing Tape 130C, 19mm ( 3/4 in) wide, (rubber tape) or equivalent from left to right, covering the back side of the module as illustrated.
Wrapping the module with rubber tape will help prevent movement in the bracket after installed.
Continue with the installation procedure.
Cadillac DeVille/DHS/DTS (2002-2005)

After the original module is removed.
Remove the corner as illustrated above from the electrical component mounting bracket.
Install two strips of Kent Automotive Adhesive-Back Shim Stock (1) 19mm ( 3/4 in) thick or equivalent to the bottom of the electrical component mounting bracket as illustrated above.

Install the OnStar® module and secure the module with nylon wire tie as illustrated. Trim the excess wire tie material.
Continue with installation procedure.
Chevrolet Cobalt (2005-2010) / Pontiac G5, Pursuit (2005-2010)
After the original module is removed.

Remove only enough material from the lower edge(1) and shoulder(2) from the bracket to allow the module to seat fully.
Continue with the installation procedure.
Chevrolet Colorado (2004-2012) / GMC Canyon (2004-2012)
After the original module is removed.

Install one side of 2" Velcro® 191195 Reclosable Loop Fastener Tape (hook and loop) or equivalent as shown above to the new OnStar® module.

Install the other side of the 2" Velcro® 191195 Reclosable Loop Fastener Tape (hook and loop) or equivalent to the OnStar® module bracket as illustrated.
Use the Reclosable Loop Fastener Tape or equivalent to secure the OnStar® module to the bracket.
Continue with the installation procedure.
Chevrolet Venture (2003-2005 / Pontiac Montana (2003-2005) / Oldsmobile Silhouette (2003-2004) / Buick Terraza (2005-2007) / Chevrolet Uplander (2005-2009) / Pontiac Montana SV6 (2005-2009) / Saturn RELAY (2005-2007)
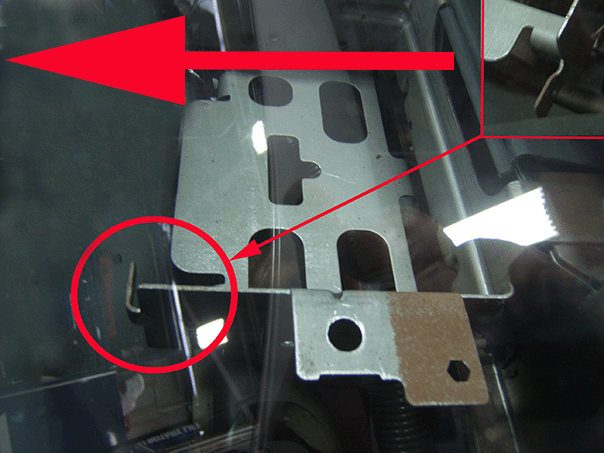
After the original module removed.
Bend the OnStar® bracket tap forward as illustrated.

Install two strips of Kent Automotive Adhesive-Back Shim Stock 3/4" Wide X 7/16" thick or equivalent to the bottom of the OnStar® module and install a piece of foam(2) to the locking strap as illustrated.
Continue with the installation procedure.
Chevrolet Equinox (2006) / Pontiac Torrent (2006)
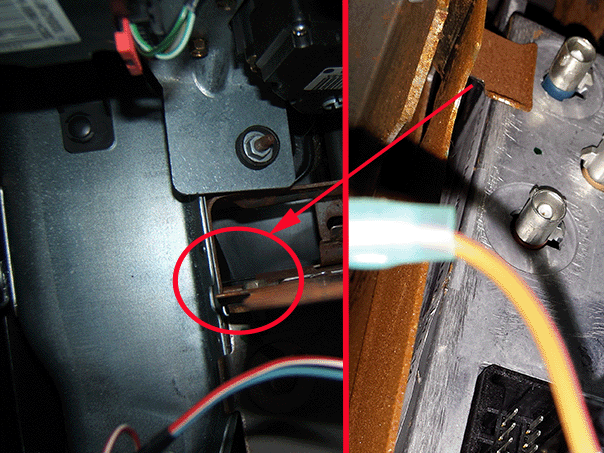
After the original module is removed.
Bend the tab, illustrated above, out of the way so the OnStar® module connector does not contact the bracket.
Continue with the installation procedure.
Saturn Astra (2008-2009)

After the original module is removed.
Remove the corner of the OnStar® bracket as illustrated above.
Continue with the installation procedure.