Diagnostic Tips For Preventing Oil Leaks After Changing Oil And Filter (15-00-90-001)
Publication date: 2015-03-06Reference number: 15-00-90-001
DIAGNOSTIC TIPS FOR PREVENTING OIL LEAKS AFTER CHANGING OIL AND FILTER
TECHNICAL SERVICE BULLETIN
| AFFECTED MODEL(S): | 2008-2015 GM Passenger Cars and Light Duty Trucks; Excluding 2013-2015 Chevrolet Spark Equipped with 4 Cylinder 1.2L Engine - RPO LL0; Equipped with Spin-On Oil Filter |
DIAGNOSTIC TIPS FOR PREVENTING OIL LEAKS AFTER CHANGING THE OIL AND FILTER
Please review the following information:
Draining Used Oil On Engine and/or Chassis Components
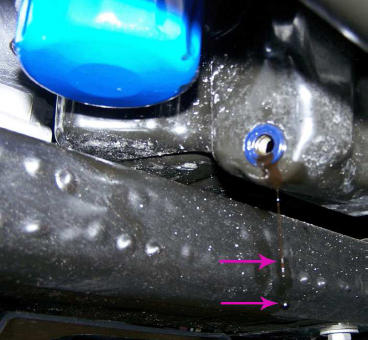
- Perform a visual inspection of the area around the oil pan drain plug to ensure sufficient clearance from engine and/or chassis components before draining the oil. (An example of improper oil contact with a chassis structure is shown).
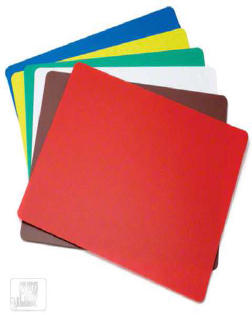
- When necessary, use folded cardboard or a flexible plastic polypropylene cutting mat (example shown) such as what is used in a kitchen, in order to channel the oil into a suitable container, which will eliminate oil spillage.
=> If any oil spillage occurs, clean the affected area immediately. This will prevent the oil from seeping into partially enclosed structures which may result in oil dripping from the vehicle for an extended period of time.
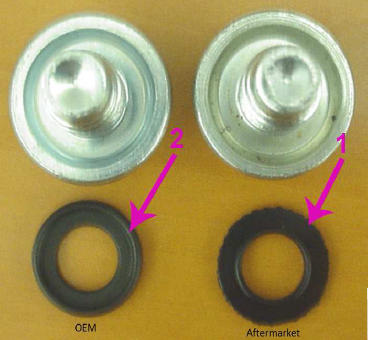
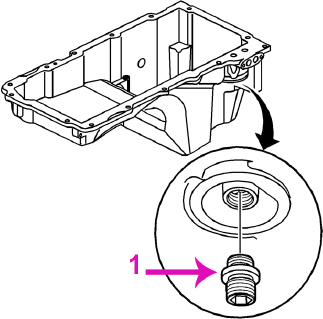
Inspecting the Oil Pan Drain Plug for a Non-OEM Seal
- Remove the oil pan drain plug and drain the oil into a suitable container.
- Inspect the oil pan drain plug for the presence of a non-OEM (aftermarket) seal (1). The OEM seal (2) is shown for reference.
=> If a non-OEM (aftermarket) seal (1) is installed on the oil pan drain plug, replace it with an OEM oil pan drain plug.
=> If a non-OEM (aftermarket) seal (1) is not installed on the oil pan drain plug, Go to the next section titled: Inspecting for a Damaged Oil Pan Drain Plug and Drain Plug Seal
Inspecting for a Damaged Oil Pan Drain Plug and Drain Plug Seal
- Inspect the oil pan drain plug for damage and for an oil leak before removing it.
- Remove the oil pan drain plug and drain the oil into a suitable container.
- Inspect the oil pan drain plug and its threads for any damage.
=> If the oil pan drain plug or its threads are damaged, replace it with an OEM oil pan drain plug.
=> If the oil pan drain plug or its threads are not damaged, Go to Step 4.
- Inspect the oil pan drain plug seal for any damage.
=> If the oil pan drain plug seal has any damage, replace it with an OEM oil pan drain plug.
=> If the oil pan drain plug seal does not have any damage, Go to Step 5.
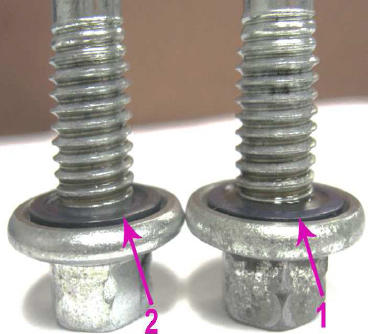
- Ensure that the oil pan drain plug seal (1) has not been forced into the oil pan drain plug as shown in the example on the right. The oil pan drain plug seal (2) should be slightly above the integral washer as shown in the example on the left.
=> If the oil pan drain plug seal (1) has been forced into the oil pan drain plug, then replace it with an OEM oil pan drain plug.
=> If the oil pan drain plug seal (2) has not been forced into the oil pan drain plug, then it is OK.
Dirt or Contamination on the Engine Side of the Oil Filter Gasket Sealing Surface
- Remove the oil pan drain plug and drain the oil into a suitable container.
- Remove the oil filter.
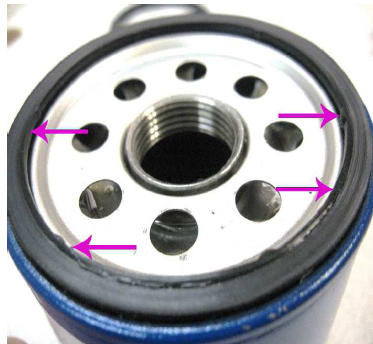
- Visually ensure that the old oil filter gasket is still on the oil filter that was just removed.
=> If the oil filter gasket is not on the oil filter that was just removed, then remove the old gasket from the engine side of the oil filter gasket sealing surface. Go to Step 4.
NOTE: Typical view of the engine side of the oil filter gasket sealing surface (1). - Clean and remove any dirt or contamination on the engine side of the oil filter gasket sealing surface (1).
- Lubricate the new oil filter gasket with clean engine oil prior to installation.

Improperly Torqued Oil Filter Adapter/Fitting
- Remove the oil pan drain plug and drain the oil into a suitable container.
- Remove the oil filter.
- Visually ensure that the oil filter gasket is still on the oil filter that was just removed.
=> If the old oil filter gasket is not on the oil filter that was just removed, then remove the old gasket from the engine side of the oil filter gasket sealing surface. Go to Step 4.
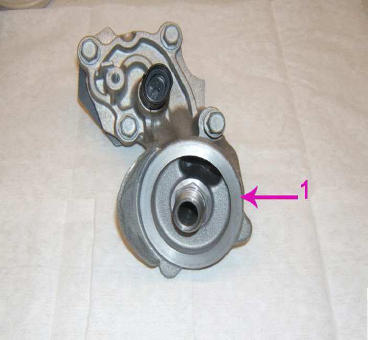
- Clean and remove any dirt or contamination on the engine side of the oil filter gasket sealing surface.NOTE: Typical view of an oil filter adapter/fitting (1).
- Using a torque wrench, verify that the oil filter adapter/fitting (1) is properly torqued. Refer to SI for the proper torque specification.
Improperly Torqued Oil Filter
- Remove the oil pan drain plug and drain the oil into a suitable container.
- Remove the oil filter.
- Visually ensure that the oil filter gasket is still on the oil filter that was just removed.
=> If the oil filter gasket is not on the oil filter that was just removed, then remove the old gasket from the engine side of the oil filter gasket sealing surface. Go to Step 4.
NOTE: Typical view of the engine side of the oil filter gasket sealing surface (1). - Clean and remove any dirt or contamination on the engine side of the oil filter gasket sealing surface (1).
- Lubricate the new oil filter gasket with clean engine oil prior to installation.
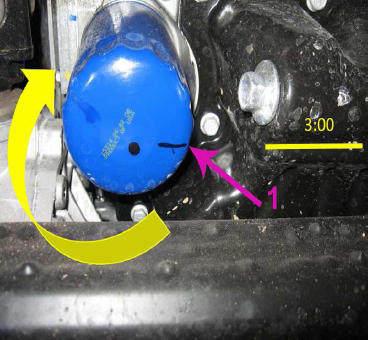
- Install and hand tighten the oil filter until it contacts the engine side of the oil filter gasket sealing surface (1).
- Using a suitable marker, mark a reference line/point on the oil filter at the 3 o'clock position (1).
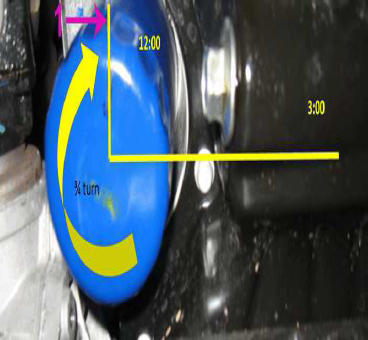
- Use an oil filter cup wrench or an equivalent tool to tighten the oil filter 3/4 of a turn from 3 o'clock to the 12 o'clock position (1). DO NOT tighten the oil filter more than one full turn.