AUDI A8 (4H)
| Vehicle | Required adapters for the connections to A/C compressor | Adapters necessary for the connections to the reservoir or receiver/dryer | Miscellaneous |
|---|---|---|---|
| Audi A8 (4H_) from MY 2010 | -- Compressor manufacturer "Denso" (block connections with radial sealing)
|
-- No adapter required, desiccant bag is removed from receiver/dryer on the condenser and the opening is sealed again for flushing. | The expansion valve is removed and the Refrigerant Circuits Adapter 18:VAS6338/18 (or the removed expansion valve is drilled for flushing and installed again (refer to CLEANING THE REFRIGERANT CIRCUIT, PRELIMINARY WORK (FLUSHING WITH REFRIGERANT R1234YF) )). |
|
To flush the circuit with the evaporator in the front A/C unit
|
||
To flush the second evaporator and corresponding lines
|
The expansion valve in the refrigerant lines to the second evaporator is removed and the Refrigerant Circuits Adapter 18:VAS6338/18 is installed (or the old removed expansion valve is drilled for flushing and reinstalled (refer to CLEANING THE REFRIGERANT CIRCUIT, PRELIMINARY WORK (FLUSHING WITH REFRIGERANT R1234YF) )). |
NOTE:
In vehicles with two evaporators, the refrigerant circuit is flushed in two work steps.
Currently the front and rear expansion valves have the same connections (only the control characteristics are different)
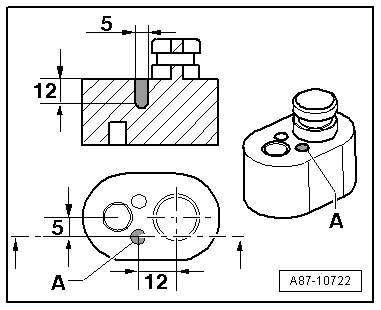
Drill an additional hole in the Refrigerant Circuits Adapter Set 1 - Adapter 5:VAS6338/5 and Refrigerant Circuits Adapter Set 1 - Adapter 11 :VAS6338/11 .
-- Drill a hole -A- in addition to the already existing hole (the dimensions in the illustration are given in mm).
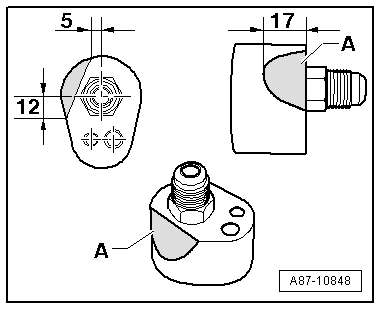
Rework the Refrigerant Circuits Adapter Set 1 - Adapter 3:VAS6338/3
-- Grind off or file off the Refrigerant Circuits Adapter Set 1 - Adapter 3:VAS6338/3 near -A- without bending the refrigerant line (dimensions in the illustration are in mm).