Engine Coolant Level Low With No Visible Loss Of Coolant (JLRTB02127NAS5)
Reference number: JLRTB02127NAS5
Supersedes refnos: JLRTB02127NAS, JLRTB02127NAS2, JLRTB02127NAS3, JLRTB02127NAS4
ENGINE COOLANT LEVEL LOW WITH NO VISIBLE LOSS OF COOLANT
SERVICE CAMPAIGN BULLETIN
| LAND ROVER: | All Models |
| SECTION: | 303-03A |
CONDITION SUMMARY
SITUATION:
A customer may express a concern that there is a 'Coolant Level Low' message displayed on the instrument panel cluster and the coolant level low or close to minimum, or that the coolant level requires frequently topping up.
CAUSE:
Permeation of water content from the engine coolant through plastic pipes.
ACTION:
Follow the Service Instruction below.
The following applies to:
All Vehicles
PARTS
- *When stock of 104123458 is depleted order 104123633.
- **An allowance equivalent to 5.00 Sterling has been allocated to locally source engine coolant.
| PART NUMBER | DESCRIPTION | QUANTITY |
|---|---|---|
| *104123458 or 104123633 | Coolant Expansion Tank | 1 |
| **ZZZ001 | Engine Coolant | 5 |
The following applies to:
INGENIUM I6 3.0L Petrol/INGENIUM I6 3.0L Petrol PHEV Vehicles Only
PARTS
- *When stock of 202123501 is depleted order 202123527.
- **The 4 undershield fixing retainers (LR165498) are required for the Plug-in Hybrid Electric Vehicle (PHEV) vehicles only .
| PART NUMBER | DESCRIPTION | QUANTITY |
|---|---|---|
| *202123501 or 202123527 | Fuel Supply Line | 1 |
| 202123508 | Fuel Supply Line to Expansion Tank Clip | 1 |
| LR185830 | Fuel Supply Line to Vapour Damper Bracket Clip | 1 |
| **LR165498 | Undershield Fixing Retainer | 4 |
TOOLS

JLR-1839
Cooling system pressure tester
JLR-303-1720-02
Coolant System Pressure Tester Cap and Adapter
WARRANTY
- Repair procedures are under constant review, and therefore times are subject to change; those quoted here must be taken as guidance only. Use TOPIx to obtain the latest repair time.
- The JLR claims submission system requires the use of causal part numbers. Labor only claims must show the causal part number with a quantity of zero.
| DESCRIPTION | SRO | TIME (HOURS) | CONDITION CODE | CAUSAL PART |
|---|---|---|---|---|
| Cooling System Pressure Test | 26.10.07 | 0.2 | * | LR151660 |
| Coolant Expansion Tank | 26.15.01 | 0.5 | * | LR151660 |
| Fuel Supply Line - Range Rover - INGENIUM I6 3L Petrol | 19.40.35 | 3.0 | * | LR178362 |
| Fuel Supply Line - Range Rover Sport - INGENIUM I6 3L Petrol | 19.40.35 | 3.0 | * | LR178362 |
| Fuel Supply Line - Range Rover - INGENIUM I6 3L Petrol - PHEV | 19.40.35 | 3.2 | * | LR178362 |
| Fuel Supply Line - Range Rover Sport - INGENIUM I6 3L Petrol - PHEV | 19.40.35 | 3.2 | * | LR178362 |
| Cooling System Concentration Check | 26.10.24 | 0.1 | * | LR151660 |
COOLING SYSTEM PRESSURE TEST
- Engine coolant can damage the paint finished surfaces. If spilt, immediately remove the fluid and clean the area with water.
- Never remove the coolant expansion tank filler cap under any circumstances while the engine is operating. Failure to follow this instruction may result in damage to the engine.
- Mating faces must be are clean and free of foreign material.
- This procedure contains some variation in the illustrations depending on the vehicle specification, but the essential information is always correct.
- This procedure contains illustrations showing certain components removed to provide extra clarity.
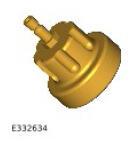
Inspect the coolant expansion tank.
- If coolant expansion tank 'B'
is installed do not
continue with this bulletin.
Repair as necessary with reference to TOPIx.
- If coolant expansion tank 'A' is installed continue to the next step.
- If coolant expansion tank 'B'
is installed do not
continue with this bulletin.
- Inspect the coolant level in the coolant expansion tank. If the coolant is at the maximum level in the coolant expansion tank and the 'Coolant Level Low' message is displayed on the instrument panel cluster do not continue with this bulletin. Repair as necessary with reference to TOPIx.
-
NOTE: Any related repairs must be claimed as a separate warranty claim.
Visually check the cooling system for signs of engine coolant leaks and distorted hoses. Make sure all the cooling system components are correctly installed.
- If there are any visual signs of engine coolant leaks do not continue with this bulletin. Repair as necessary with reference to TOPIx.
- If there are no visual signs of engine coolant leaks continue to the next step.
NOTE: The following procedure will enable the cooling system to be pressure tested for condition and leaks. Step 4 will check the expansion tank filler cap seal and the filler cap for leaks. Step 6 will check the entire cooling system. -
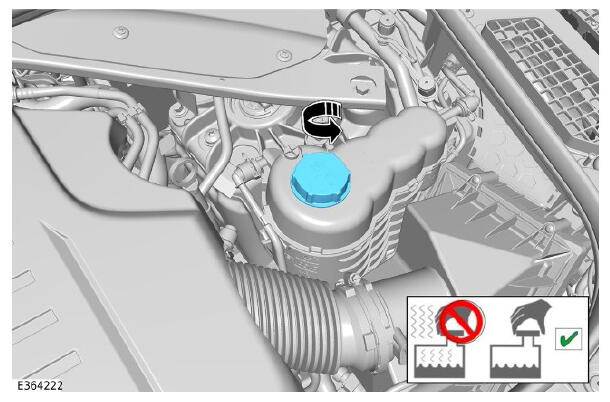
WARNING: Release the cooling system pressure by slowly turning the coolant expansion tank cap a quarter of a turn. Cover the expansion tank cap with a thick cloth to prevent the possibility of scalding. Failure to follow this instruction may result in personal injury.CAUTION: Be prepared to collect escaping coolant.
Remove the coolant expansion tank filler cap.
-
WARNING: Do not pressurize the coolant expansion tank filler cap to the maximum pressure shown on the filer cap.NOTE: Any related repairs must be claimed as a separate warranty claim.
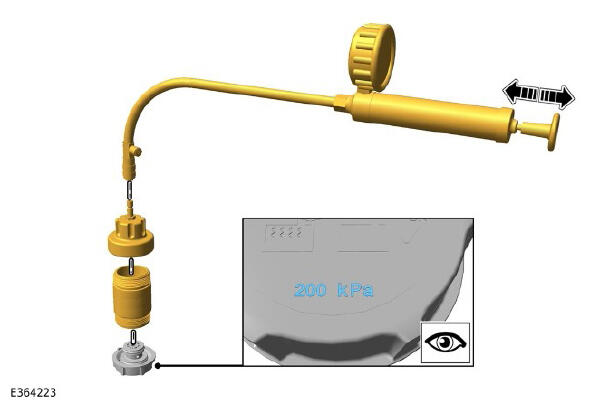
Using the correct adapter connect the cooling system pressure tester to the coolant expansion tank filler cap.
- Slowly pressurize the coolant expansion tank filler cap 1.6 bar (23 psi) as shown on the gauge. No significant drop in pressure must be noted on the coolant expansion tank filler cap. If after 5 minutes the pressure significantly drops, the coolant expansion tank filler cap must be replaced.
- If 1.6 bar (23 psi) is reached with no drop in pressure, validate the coolant expansion tank filler cap by increasing the pressure to between 1.7 bar (25 psi) to 2.1 bar (30 psi) to confirm the valve is operating as intended. The pressure must be released through the coolant expansion tank filler cap.
- If the coolant expansion tank filler cap fails this test, the coolant expansion tank cap must be replaced. This must be completed under related repairs and must be claimed as a separate warranty claim.
- Depressurize and remove the coolant expansion filler tank cap from the cooling system pressure tester.
- Disassemble the cooling system pressure tester.
-
CAUTION: Do not exceed 2.0 bar (28 psi) when pressurizing the cooling system.NOTE: If the pressure continues to drop after the initial tolerance, the cooling system must to be checked for leaks.
Using the correct adapter connect the cooling system pressure tester to the coolant expansion tank.
- Slowly pressurize the cooling system until 2.0 bar (28 psi) is shown on the gauge.
- No significant drop in pressure must be noted on the cooling pressure tester gauge. If after 5 minutes the pressure significantly drops, inspect the cooling system for leaks. A pressure drop of 0.15 bar (1psi) in the first minute is considered normal operation.
Depressurize and remove the cooling system pressure tester.
- Install the coolant expansion 9. tank filler cap.
-
NOTE: Any related repairs must be claimed as a separate warranty claim.
Visually check the cooling system for signs of engine coolant leaks.
- If there are any visual signs of engine coolant leaks do not continue with this bulletin. Repair as necessary with reference to TOPIx.
- If there are no visual signs of engine coolant leaks complete the SERVICE INSTRUCTION section of this bulletin.


SERVICE INSTRUCTION
INGENIUM I6 3.0L Petrol, INGENIUM I6 3.0L Petrol PHEV Vehicles Only:
- Remove the fuel supply line (see TOPIx Workshop Manual section 310-01: Fuel Tank and Lines - Removal and Installation - Fuel Supply Line).
All Vehicles:
- Renew the coolant expansion tank (see TOPIx Workshop Manual section 303-03: Engine Cooling - Removal and Installation - Coolant Expansion Tank).
INGENIUM I6 3.0L Petrol, INGENIUM I6 3.0L Petrol PHEV Vehicles Only:
- Install the new fuel supply line (see TOPIx Workshop Manual section 310-01: Fuel Tank and Lines - Removal and Installation - Fuel Supply Line).
All Vehicles:
- Check the coolant concentration (see TOPIx Workshop Manual section 303-03: Engine Cooling - General Procedure - Cooling System Concentration Check).