A-Pillar Exterior Trim Installation Procedure (LTB00655NAS2)
WARNING: This page is about the Range Rover Base, which is a different variant/trim than selected.
Publication date: 2015-09-28Reference number: LTB00655NAS2
Supersedes refnos: LTB00655NAS1
A-PILLAR EXTERIOR TRIM INSTALLATION PROCEDURE
TECHNICAL SERVICE BULLETIN
Reference Number(s): LTB00655NAS2, Date of Issue:
September 28, 2015
| LAND ROVER: | 2014 Onwards Range Rover Sport (LW); 2013 Onwards Range Rover (LG) |
| SECTION: | 501-08 |
| AFFECTED VEHICLES: | Range Rover Sport (LW) Model Year: 2014 Onwards VIN: 000002 Onwards Manufacturing Plant: Solihull; Range Rover (LG) Model Year: 2013 Onwards VIN: 000083 Onwards Manufacturing Plant: Solihull |
NOTE:
This reissue replaces all previous versions. Please destroy all previous versions.
CONDITION SUMMARY
Situation: A procedure has been developed for the installation of A-pillar exterior trim.
Cause: Replacement of the A-pillar exterior trim.
Action: In the event it becomes necessary to replace the A-pillar exterior trim, follow the Service Instruction outlined below.
PARTS
NOTE:
Use only the 209N primer included in the A-Pillar exterior trim installation kit; other primers will not offer the required performance.
PARTS INFORMATION
| LR057984 | A-Pillar exterior trim installation kit | Quantity: 1 |
TOOLS
No Tools Required
WARRANTY
NOTE:
Repair procedures are under constant review, and therefore times are subject to change; those quoted here must be taken as guidance only. Always refer to TOPIx to obtain the latest repair time.
NOTE:
DDW requires the use of causal part numbers. Labor only claims must show the causal part number with a quantity of zero.
| DESCRIPTION | SRO | TIME (HOURS) | CONDITION CODE | CAUSAL PART |
|---|---|---|---|---|
| A-pillar exterior trim - Left - Remove and install | 76.43.39 | 0.4 | 07 | LR037542 |
| A-pillar exterior trim - Right - Remove and install | 76.43.40 | 0.4 | 07 | LR037541 |
NOTE:
Normal Warranty procedures apply.
SERVICE INSTRUCTION
NOTE:
Use only the 209N primer included in the A-Pillar exterior trim installation kit; other primers will not offer the required performance.
NOTE:
The primary A-pillar trim bonding medium is the adhesive supplied in the A-Pillar exterior trim installation kit; clips and adhesive tapes are only to locate and secure while the adhesive cures.
NOTE:
No solvent should be used on the A-pillar finisher front or back. Use only a dry wipe process on the adhesive surface only if required.
- Using a suitable cloth, apply the primer taken from the A-pillar exterior trim installation kit.
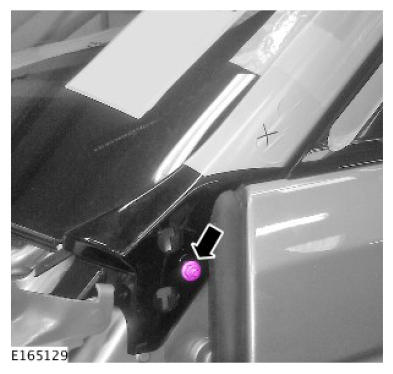
- Remove the A-pillar buffer.
- Remove the A-pillar lower retaining nut.
- Using a suitable tool, detach the A-pillar trim.
- Using a suitable tool, remove all traces of sealant from the A-pillar.
NOTE: The new adhesive seal must be installed between the alignment lines marked on the frame.NOTE: Prepare the adhesive in accordance with the instructions included with the exterior A-pillar fitment kit.
- Apply adhesive from the exterior A-pillar fitment kit to the primed areas.
- Using suitable rubber gloves, peel the adhesive backing tape from the part to assist with location during adhesive curing.
CAUTION: Make sure that the mating faces are clean and free of foreign material. - Using suitable rubber gloves, peel the adhesive backing tape from the part to assist with location during adhesive curing.
- Install the new A-pillar trim.
- Locate the bottom lug to help position the part, then locate the top clip followed by the bottom clip into their holes.
- Squeeze the trim onto the vehicle, making sure to adhere the tape.
NOTE: The adhesive takes four (4) hours to set, please make sure the doors are not repeatedly opened during this time to allow the adhesive to cure. - Apply four (4) pieces of masking tape up the A-pillar while the adhesive cures.
- Install the A-pillar lower retaining nut.
- Install the A-pillar buffer.