Condenser, Receiver/Dryer
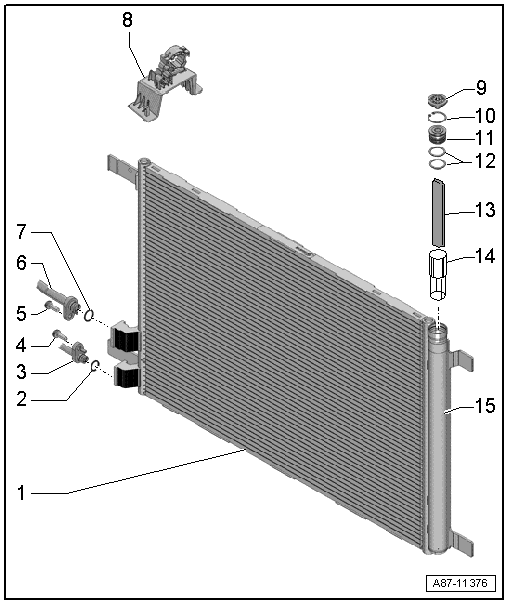
- Condenser
- There are different versions.
- Removing and Installing. Refer to CONDENSER, REMOVING AND INSTALLING .
- O-Ring
- Replacing. Refer to the Parts Information for the versions.
- Coat with refrigerant oil before installing. Refer to REFRIGERANT CIRCUIT SEALS .
- Refrigerant Line
- To the connection point on the right longitudinal member (to the inner heat exchanger)NOTE:
Refrigerant lines from condenser to the inner heat exchanger and to the A/C compressor is available in different versions, depending on version of vehicle. On vehicles with a 2.5L TFSI engine (Audi RS3) thee is an additional connection location on these refrigerant lines. If necessary disconnect the refrigerant lines at these connection points. For bolts on the connection locations the same tightening specifications apply as for the bolts on the refrigerant lines on the inner heat exchanger or on the condenser.
On vehicle with a 2.5L TFSI engine (Audi RS3) different versions of the refrigerant line from the condenser can only be removed if necessary with the condenser removed, if necessary disconnect the refrigerant lines from the connection locations on the refrigerant lines
- To the connection point on the right longitudinal member (to the inner heat exchanger)
- Bolt
- 8 Nm
- Bolt
- 8 Nm
- Refrigerant Line
- From the A/C compressorNOTE:
Refrigerant lines from condenser to the inner heat exchanger and to the A/C compressor is available in different versions, depending on version of vehicle. On vehicles with a 2.5L TFSI engine (Audi RS3) thee is an additional connection location on these refrigerant lines. If necessary disconnect the refrigerant lines at these connection points. For bolts on the connection locations the same tightening specifications apply as for the bolts on the refrigerant lines on the inner heat exchanger or on the condenser.
On vehicle with a 2.5L TFSI engine (Audi RS3) different versions of the refrigerant line from the condenser can only be removed if necessary with the condenser removed, if necessary disconnect the refrigerant lines from the connection locations on the refrigerant lines
- From the A/C compressor
- O-Ring
- Replacing. Refer to the Parts Information for the versions.
- Coat with refrigerant oil before installing. Refer to REFRIGERANT CIRCUIT SEALS .
- Bracket
- For the refrigerant lines
- Cap
- There are different versions.
- Circlip
- Cap
- 2 Nm
- Replace if damaged
- There are different versions.
- O-Rings
- Replacing. Refer to the Parts Information for the versions.
- Coat with refrigerant oil before installing. Refer to REFRIGERANT CIRCUIT SEALS .
- Dryer Cartridge
- There are different versions.
- Removing and Installing:
- Denso condenser. Refer to DRYER CARTRIDGE, REMOVING AND INSTALLING, DENSO CONDENSER .
- Modine condenser. Refer to DRYER CARTRIDGE, REMOVING AND INSTALLING, MODINE CONDENSER .
- Showa/Keihin condenser. Refer to DRYER CARTRIDGE, REMOVING AND INSTALLING, SHOWA/KEIHIN CONDENSER .
- Screen
- There are different versions.
- Removing and Installing. Refer to DRYER CARTRIDGE, REMOVING AND INSTALLING, MODINE CONDENSER .
- Receiver/Dryer
- There are different versions.
- Is integrated in the condenser on this version