Overview, Electrically-Driven A/C Compressor, Refrigerant Line. High-Voltage Battery Heat EXCHANGER (On Vehicles With A High-Voltage System).
 Courtesy of AUDI OF AMERICA, LLC
- Electrically-Driven A/C Compressor
- Overview. Refer to OVERVIEW - A/C COMPRESSOR POWER UNIT, ELECTRICALLY-DRIVEN A/C COMPRESSOR .
- With A/C Compressor Control Module -J842- and Electrical A/C Compressor -V470-
- Removing and Installing. Refer to ELECTRICALLY-POWERED A/C COMPRESSOR, REMOVING AND INSTALLING .
- Different versions (for example vehicles for Europe and North America).
- There are different versions depending on the refrigerant (R134a or R1234yf).
- Additional information on the Electrically-Driven A/C Compressor. Refer to SYSTEM OVERVIEW - REFRIGERANT CIRCUIT, VEHICLES WITH HIGH VOLTAGE SYSTEM .
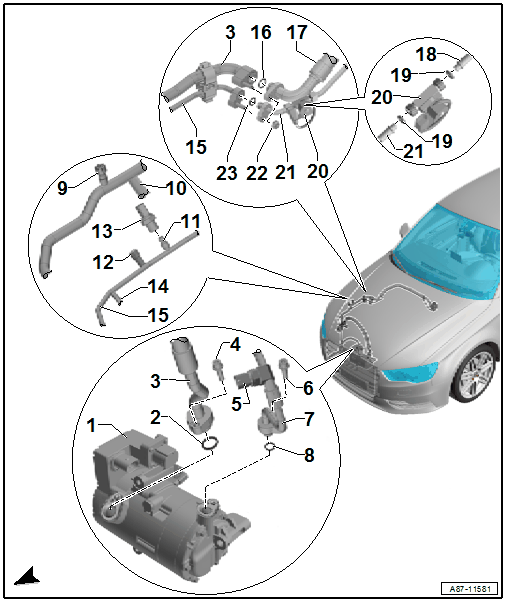
- O-Ring
- Always replace. Refer to the Parts Information for the version.
- Coat with refrigerant oil before installing. Refer to REFRIGERANT CIRCUIT SEALS .
- Refrigerant Line - Low Pressure Side
- From the connection point on the right longitudinal member to the A/C compressor
- With outlet to the high-voltage battery heat exchanger
- Additional weight on the refrigerant line. Refer to ADDITIONAL WEIGHT ON REFRIGERANT LINE .NOTE:
An additional weight (balance weight, resonator in the refrigerant line to reduce noise) may be present on this refrigerant line depending on the refrigerant line version and the production period. Make sure that this component is not touching or can come in contact with other components during operation (noise).
- Bolt
- 22 Nm
- A/C Pressure/Temperature Sensor -G395-
- 8 Nm
- To check, use the Vehicle Diagnostic Tester in the "Guided Fault Finding" function. Refer to the appropriate Wiring Diagram(s).
- Only installed on specific versions (for example vehicles for North America).
- Removing and Installing. Refer to A/C PRESSURE/TEMPERATURE SENSOR -G395-, REMOVING AND INSTALLING .NOTE:
For vehicles with an A/C Pressure/Temperature Sensor -G395-, there is a different version of the Electrical A/C Compressor -V470- (with the A/C Compressor Control Module -J842-) and another version of the A/C control head (the Climatronic Control Module -J255-) installed in addition to the pressure sensor. Use the Vehicle Diagnostic Tester in the "Guided Fault Finding" function and
CAUTION:Danger due to refrigerant coming out under pressure when removing the A/C Pressure/Temperature Sensor -G395- if the refrigerant circuit is not completely empty.
Danger of frost bite to skin and other parts of the body.
- Only remove the A/C Pressure/Temperature Sensor -G395- when the refrigerant circuit is empty; the connection is without a valve. Refer to A/C SYSTEM, GENERAL INFORMATION (R134a)REFRIGERANT CIRCUIT (R1234yf) / REFRIGERANT CIRCUIT (R134a) .
- Bolt
- 22 Nm
- Refrigerant Line
- To the condenser
- Different versions (with and without connection for the A/C Pressure/Temperature Sensor -G395-).
- Outlet of the Refrigerant Line - High Pressure Side
- To the high-voltage battery heat exchanger
- Low Pressure Side Service ConnectionCAUTION:
Danger due to refrigerant coming out under pressure when there is a faulty valve in the refrigerant circuit.
Danger of frost bite to skin and other parts of the body.
- Only remove when the refrigerant circuit is empty; the connection is without a valve. Refer to A/C SYSTEM, GENERAL INFORMATION (R134a) or REFRIGERANT CIRCUIT (R1234yf) / REFRIGERANT CIRCUIT (R134a) .
- Removing and Installing. Refer to SERVICE CONNECTION ON LOW AND HIGH PRESSURE SIDE, REMOVING AND INSTALLING .
- There are different versions depending on the refrigerant (R134a or R1234yf). Refer to SERVICE CONNECTION DIFFERENCES, DEPENDING ON REFRIGERANT (R134A OR R1234YF) .
- Outlet of the refrigerant Line - Low Pressure Side
- To the high-voltage battery heat exchanger
- Refrigerant Circuit Pressure Sensor -G805- Connection
- Only installed on specific versions (not installed for example vehicles for North America).
- High Pressure Side Service ConnectionCAUTION:
Danger due to refrigerant coming out under pressure when there is a faulty valve in the refrigerant circuit.
Danger of frost bite to skin and other parts of the body.
- Only remove when the refrigerant circuit is empty; the connection is without a valve. Refer to A/C SYSTEM, GENERAL INFORMATION (R134a) or REFRIGERANT CIRCUIT (R1234yf) / REFRIGERANT CIRCUIT (R134a) .
- Removing and Installing. Refer to SERVICE CONNECTION ON LOW AND HIGH PRESSURE SIDE, REMOVING AND INSTALLING .
- There are different versions depending on the refrigerant (R134a or R1234yf). Refer to SERVICE CONNECTION DIFFERENCES, DEPENDING ON REFRIGERANT (R134A OR R1234YF) .
- Refrigerant Circuit Pressure Sensor -G805-
- 5 Nm
- To check, use the :Vehicle Diagnostic Tester in the "Guided Fault Finding" function. Refer to the appropriate Wiring Diagram(s).
- Removing and Installing. Refer to REFRIGERANT CIRCUIT PRESSURE SENSOR -G805-, REMOVING AND INSTALLING .
- Only installed on specific versions (not installed for example vehicles for North America).NOTE:
For vehicles with a Refrigerant Circuit Pressure Sensor -G805- or an A/C Pressure/Temperature Sensor -G395-, the Electrical A/C Compressor -V470- version (with the A/C Compressor Control Module -J842-) and A/C control head version (the Climatronic Control Module -J255-) is also different in addition to the pressure sensor. Use the Vehicle Diagnostic Tester in the "Guided Fault Finding" function.
Depending on the version of the refrigerant line, the Refrigerant Circuit Pressure Sensor -G805- can also be installed on vehicles with an A/C Pressure/Temperature Sensor -G395- in order to close the connection with the valve securely. For these vehicles, the Refrigerant Circuit Pressure Sensor -G805- is not connected to the vehicle electrical system.
- Outlet of the Refrigerant Line - High Pressure Side
- To the high-voltage battery heat exchanger
- Refrigerant Line - High Pressure Side
- From the condenser to the connection point on the right longitudinal member
- With outlet to the high-voltage battery heat exchanger
- There are different versions (with and without connection for the Refrigerant Circuit Pressure Sensor -G805-).
- O-Ring
- Always replace. Refer to the Parts Information for the version.
- Coat with refrigerant oil before installing. Refer to REFRIGERANT CIRCUIT SEALS .
- Refrigerant Line - Low Pressure Side
- From the expansion valve to the connection point on the right longitudinal member
- Removing and Installing. Refer to REFRIGERANT LINES WITH INNER HEAT EXCHANGER, REMOVING AND INSTALLING .
- Refrigerant Line - High Pressure Side
- From the Heater and A/C Unit Refrigerant Shut-Off Valve -N541- to the expansion valve
- From the connection point on the right longitudinal member to the Heater and A/C Unit Refrigerant Cut-Off Valve -N541-
- Removing and Installing. Refer to HEATER AND A/C UNIT REFRIGERANT CUT-OFF VALVE -N541-, REMOVING AND INSTALLING and REFRIGERANT LINES WITH INNER HEAT EXCHANGER, REMOVING AND INSTALLING .
- O-Ring
- Always replace. Refer to the Parts Information for the version.
- Coat with refrigerant oil before installing. Refer to REFRIGERANT CIRCUIT SEALS .
- Heater and A/C Unit Refrigerant Shut-Off Valve -N541-
- To check, use the Vehicle Diagnostic Tester in the "Guided Fault Finding" function. Refer to COOLING OUTPUT, CHECKING and the appropriate Wiring Diagram(s).
- Removing and Installing. Refer to HEATER AND A/C UNIT REFRIGERANT CUT-OFF VALVE -N541-, REMOVING AND INSTALLING .
- Refrigerant Line - High Pressure Side
- From the connection point on the right longitudinal member to the Heater and A/C Unit Refrigerant Shut-Off Valve -N541-
- Removing and Installing. Refer to REFRIGERANT LINES WITH INNER HEAT EXCHANGER, REMOVING AND INSTALLING .
- Nut
- 8 Nm
- O-Ring
- Always replace. Refer to the Parts Information for the version.
- Coat with refrigerant oil before installing. Refer to REFRIGERANT CIRCUIT SEALS .

- Refrigerant Line - Low Pressure Side
- From the expansion valve to the connection point on the right longitudinal member
- Removing and Installing. Refer to REFRIGERANT LINES WITH INNER HEAT EXCHANGER, REMOVING AND INSTALLING .
- O-Ring
- Always replace. Refer to the Parts Information for the version.
- Coat with refrigerant oil before installing. Refer to REFRIGERANT CIRCUIT SEALS .
- Expansion Valve
- There are different versions.
- There are different versions depending on the refrigerant (R134a or R1234yf).
- Removing and Installing. Refer to EXPANSION VALVE, REMOVING AND INSTALLING .
- Bolt
- 10 Nm
- Quantity: 2
- O-Ring
- Always replace. Refer to the Parts Information for the version.
- Coat with refrigerant oil before installing. Refer to REFRIGERANT CIRCUIT SEALS .
- Bolt
- 8 Nm
- Refrigerant Line - High Pressure Side
- From the Heater and A/C Unit Refrigerant Shut-Off Valve -N541-. Refer to -Item 20- to the expansion valve
- Refrigerant line from the connection point on the right longitudinal member to the Heater and A/C Unit Refrigerant Cut-Off Valve -N541-. Refer to -Item 21-
- Removing and Installing. Refer to HEATER AND A/C UNIT REFRIGERANT CUT-OFF VALVE -N541-, REMOVING AND INSTALLING and REFRIGERANT LINES WITH INNER HEAT EXCHANGER, REMOVING AND INSTALLING .
- High-Voltage Battery Heat Exchanger
- To check, use the Vehicle Diagnostic Tester in the "Guided Fault Finding" function. Refer to the appropriate Wiring Diagram(s).
- Removing and Installing. Refer to HIGH VOLTAGE BATTERY HEAT EXCHANGER, REMOVING AND INSTALLING .
- O-Ring
- Replace. Refer to the Parts Information for the version.
- Coat with refrigerant oil before installing. Refer to REFRIGERANT CIRCUIT SEALS .
- Refrigerant Line - High Pressure Side (with Restrictor)
- From the High-Voltage Battery Heater Core Refrigerant Cut-Off Valve -N542- to the high-voltage battery heat exchanger
- A constriction (restrictor) is installed in this refrigerant line. Refer to REFRIGERANT LINE WITH RESTRICTOR .
- To remove, remove the High-Voltage Battery Heater Core Refrigerant Shut-Off Valve -N542- (Refer to HIGH VOLTAGE BATTERY HEATER CORE REFRIGERANT CUT-OFF VALVE -N542-, REMOVING AND INSTALLING ) and remove the refrigerant line from the High-Voltage Battery Heat Exchanger (refer to HIGH VOLTAGE BATTERY HEAT EXCHANGER, REMOVING AND INSTALLING
).NOTE:
To remove, remove the High-Voltage Battery Heater Core Refrigerant Shut-Off Valve -N542- (refer to HIGH VOLTAGE BATTERY HEATER CORE REFRIGERANT CUT-OFF VALVE -N542-, REMOVING AND INSTALLING ) and remove the refrigerant line from the High-Voltage Battery Heat Exchanger (Refer to HIGH VOLTAGE BATTERY HEAT EXCHANGER, REMOVING AND INSTALLING ).
The diameter of the bore is approximately 0.7 mm. Depending on the version of the refrigerant line, this constriction is either permanently installed in the refrigerant line or is only inserted. A screen to separate floating deposits may be installed on the inserted version, which can block the restrictor hole.
The restrictor limits the refrigerant flow to the high-voltage battery heat exchanger with an open High-Voltage Battery Heater Core Refrigerant Shut-Off Valve -N542- (and with this its cooling output).
- Bolt
- 8 Nm
- High-Voltage Battery Heater Core Refrigerant Shut-Off Valve -N542-
- To check, use the :Vehicle Diagnostic Tester in the "Guided Fault Finding" function. Refer to COOLING OUTPUT, CHECKING and the appropriate Wiring Diagram(s).
- Removing and Installing. Refer to HIGH VOLTAGE BATTERY HEATER CORE REFRIGERANT CUT-OFF VALVE -N542-, REMOVING AND INSTALLING .
- Refrigerant Line - High Pressure Side
- Refrigerant line to the High-Voltage Battery Heater Core Refrigerant Cut-Off Valve -N542- from the outlet in the refrigerant line - high pressure side (from the condenser to the connection point on the right longitudinal member). Refer to -Item 14-.
- O-Ring
- Always replace. Refer to the Parts Information for the version.
- Coat with refrigerant oil before installing. Refer to REFRIGERANT CIRCUIT SEALS .
- Refrigerant Line - Low Pressure Side
- Refrigerant line from the high-voltage battery heat exchanger to the outlet in the refrigerant line - low pressure side (from the connection point on the right longitudinal member to the A/C compressor). Refer to -Item 10-