Refrigerant Lines With Inner Heat EXCHANGER, Removing And Installing: Removing
-- Discharge the refrigerant circuit. Refer to REFRIGERANT CIRCUIT, DISCHARGING WITH A/C SERVICE STATION (R134a) / REFRIGERANT CIRCUIT, EVACUATING WITH A/C SERVICE STATION (R134a) / REFRIGERANT CIRCUIT, CHARGING WITH A/C SERVICE STATION (R134a) (Refrigerant R134a Servicing, Refrigerant Circuit, Working with A/C Service Station) or REFRIGERANT CIRCUIT, DISCHARGING (R1234yf) / REFRIGERANT CIRCUIT, EVACUATING (R1234yf) / REFRIGERANT CIRCUIT, CHARGING (R1234yf) .
Vehicles With 1.8L TFSI Engine
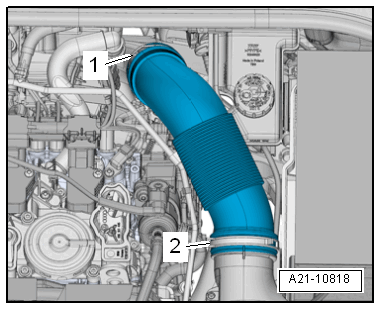
-- Loosen the hose clamps -1 and 2- and remove the air guide pipe.
Vehicles With 2.0L TDI Engine
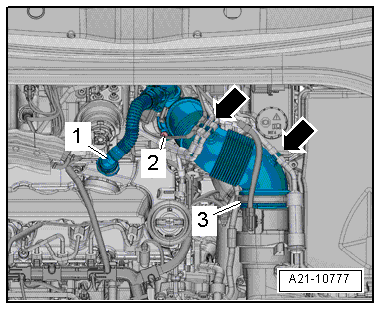
-- Press the release buttons on the hose -1- for the crankcase ventilation and remove the hose from the cylinder head cover.
-- Free up the vacuum hoses at the air guide pipe -arrows-.
-- Loosen the hose clamp -3-.
-- Remove the bolt -2- and tilt the air guide pipe with the connection downward and remove it from the turbocharger.
Vehicles With A High Voltage System
-- Loosen the bracket -A- (for the High Voltage Battery Coolant Valve -N688-) from the plenum chamber bulkhead.

-- Loosen and carefully bend back the heat shield -B- in the area of the Heater and A/C Unit Refrigerant Shut-Off Valve -N541- -D- and the refrigerant line -F- (to the separating point on the right longitudinal member) from the plenum chamber bulkhead.
For All Vehicles
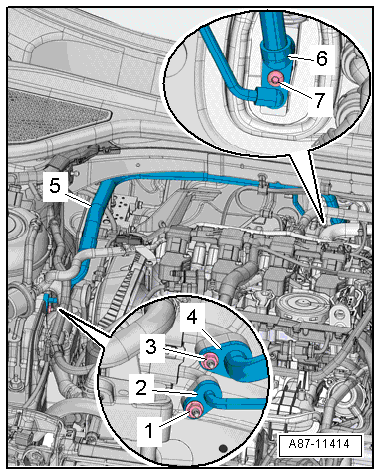
-- Remove the sheet spring nut -1 and 3-.

-- Fold the heat shield -2- as far forward as possible -arrow-.
Danger Due To Refrigerant Coming Out Under Pressure.
Danger of frost bite to skin and other parts of the body.
- Evacuate the refrigerant and immediately open the refrigerant circuit afterward.
- If more than 10 minutes have elapsed since evacuating the refrigerant and the refrigerant circuit was not opened, evacuate the refrigerant again. Pressure in the refrigerant circuit is caused by evaporation.
-- Remove the bolt -7-.
-- Disconnect the refrigerant line -6- with the inner heat exchanger from the expansion valve.
-- Remove the nuts -1 and 3- and the refrigerant lines -2 and 4-.
-- Remove the refrigerant line -5- with the inner heat exchanger to the right.
-- Seal the open lines and connections with clean plugs from the :VAS6122 .